Unleashing the Power of Solana: A Comprehensive Guide to Building Mobile Apps with Solana Mobile Stack
Building Seamless Solana-Powered Apps with Solana Mobile Stack(SMS)


If you delve into the realm of Blockchain development, one noticeable aspect is the limited availability of native apps. Only a select few exist, and this scarcity can be attributed to various factors such as inadequate tooling, broken functionalities, or insufficient documentation. However, it's crucial to dispel the notion that everything is inaccessible or broken. In reality, the resources are available; one simply needs to explore and construct them, as the process is straightforward.
Adopting this perspective, Let's explore the world of decentralized apps (DApps) on Solana—a blockchain for scalable and decentralized applications. Founded in 2017 , Solana is known for its impressive speed and lower transaction fees compared to other Layer 1 platforms.
This guide delves deep into the Solana Mobile Stack, a powerful toolkit tailored for crafting mobile-native DApps. It's the go-to for Web3 developers seeking to build user-friendly and potent decentralized applications
Solana Mobile Stack (SMS)
Before continuing , Let's see What Exactly is Solana Mobile Stack(SMS).
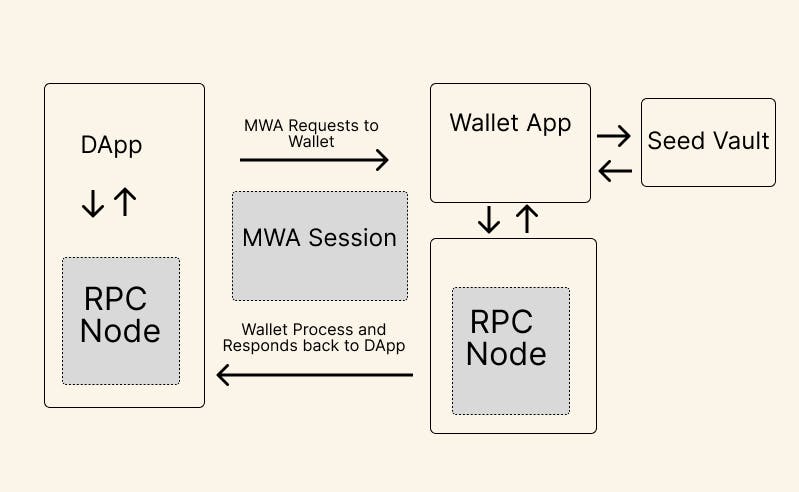
The Solana Mobile Stack (SMS) comprises essential technologies designed for constructing mobile applications capable of seamless interaction with the Solana blockchain. Among its key components is the Mobile Wallet Adapter (MWA), a protocol specification facilitating the connection between mobile decentralized applications (dApps) and mobile Wallet Apps.(You may consider it as WalletConnect that provides a way to connect wallet and DApps).
This protocol enables effective communication for Solana transaction and message signing. Notably, dApps implementing MWA can seamlessly connect to any compatible MWA Wallet App, streamlining the process of authorization, signing, and sending for transactions and messages. This eliminates the need for developers to individually incorporate support for each wallet, offering a significant advantage as they can integrate once and employ a unified API, ensuring compatibility with every compliant Solana wallet.
Overview of MWA Visualised :
To further enhance the development experience, Solana Mobile provides an official Mobile Wallet Adapter SDK that implements the MWA protocol.
Originally crafted as an Android Kotlin/Java library, the SDK is versatile and has been ported to other popular frameworks listed below.
Android - (Java/Kotlin)
React Native
Flutter
Unity
Unreal Engine
This cross-framework compatibility empowers developers to leverage the SDK's capabilities across a variety of platforms, fostering flexibility and efficiency in the creation of mobile-native dApps within the web3 mobile landscape.
Let's Go through each of SDK available in a brief .
Mobile Wallet Adapter (MWA) Client Libraries:
Kotlin Library (mobile-wallet-adapter-clientlib-ktx):
Implements MWA protocol in Kotlin.
Facilitates session initiation between dApp and wallet.
Recommended for native Android app development.
Java Library (
mobile-wallet-adapter-clientlib):Equivalent to Kotlin library but implemented in Java.
Kotlin library is recommended for a modern development experience.
React Native SDK:
Uses React Native for cross-platform app development.
Leverages Solana's
@solana/web3.jslibrary.Includes
@solana-mobile/mobile-wallet-adapter-protocolfor MWA support.
@solana/web3.jsLibrary:Official Solana JavaScript SDK.
Provides abstraction classes and RPC Connection Client.
Used for interacting with Solana network through JSON RPC API.
Flutter SDK:
Integrates Solana Mobile Stack (SMS) into Flutter.
Includes Mobile Wallet Adapter for Flutter projects.
Solana Dart Library:
Dart implementation of Solana JSON RPC API client.
Convenient interface for interacting with Solana RPC methods.
Unity SDK:
Community-led project for Solana NFT support and RPC in Unity.
Integrates Solana blockchain features into Unity applications.
Unreal Engine SDK (solana-saga-unreal-sdk):
Open-source Unreal Engine plugin.
Integrates with Solana Mobile Stack for wallet signing in Unreal Engine projects.
Community-driven, may be under ongoing development.
But Solana has launched it's own android based smart phone, called Solana Saga.
Without Saga Phone: Developers using Solana Mobile Stack (SMS) without the Saga phone can still harness its powerful capabilities for building web3 native dApps. SMS offers tools like Mobile Wallet Adapter, providing access to Solana's efficient blockchain network. While developers enjoy flexibility across various devices, they may miss out on premium hardware optimizations tailored for web3.
With Saga Phone: The Saga phone enhances the web3 development experience with premium hardware, including a Seed Vault for seamless asset self-custody and heightened security. The curated dApp Store simplifies exploration and utilization of web3 applications. The synergy between Saga phone and SMS creates an optimized environment, offering developers an efficient, secure, and premium platform for web3 mobile development.
So At this point, you should have clear that What is Solana Mobile Stack, what it offers and how one can leverage to build DApps with it.
So Let's create one sample app using SMS, here I am going to build the App with React Native SDK, so it will be easy for beginners to grasp .
Prerequisites
Before Starting to code, make sure you have Installed
A Basic knowledge about React and Javascript
NodeJS environment
JAVA_HOME environment variable set
Android Studio Installed along with Android SDK Tools
ANDROID_HOME Path setup. (See this to set up depending on your system to set up)
A Basic knowledge about Solana.
A Physical device or emulator installed with MWA Compatible Solana Wallet.
So Let's start coding.
Here's the Overview Of How our App will look like
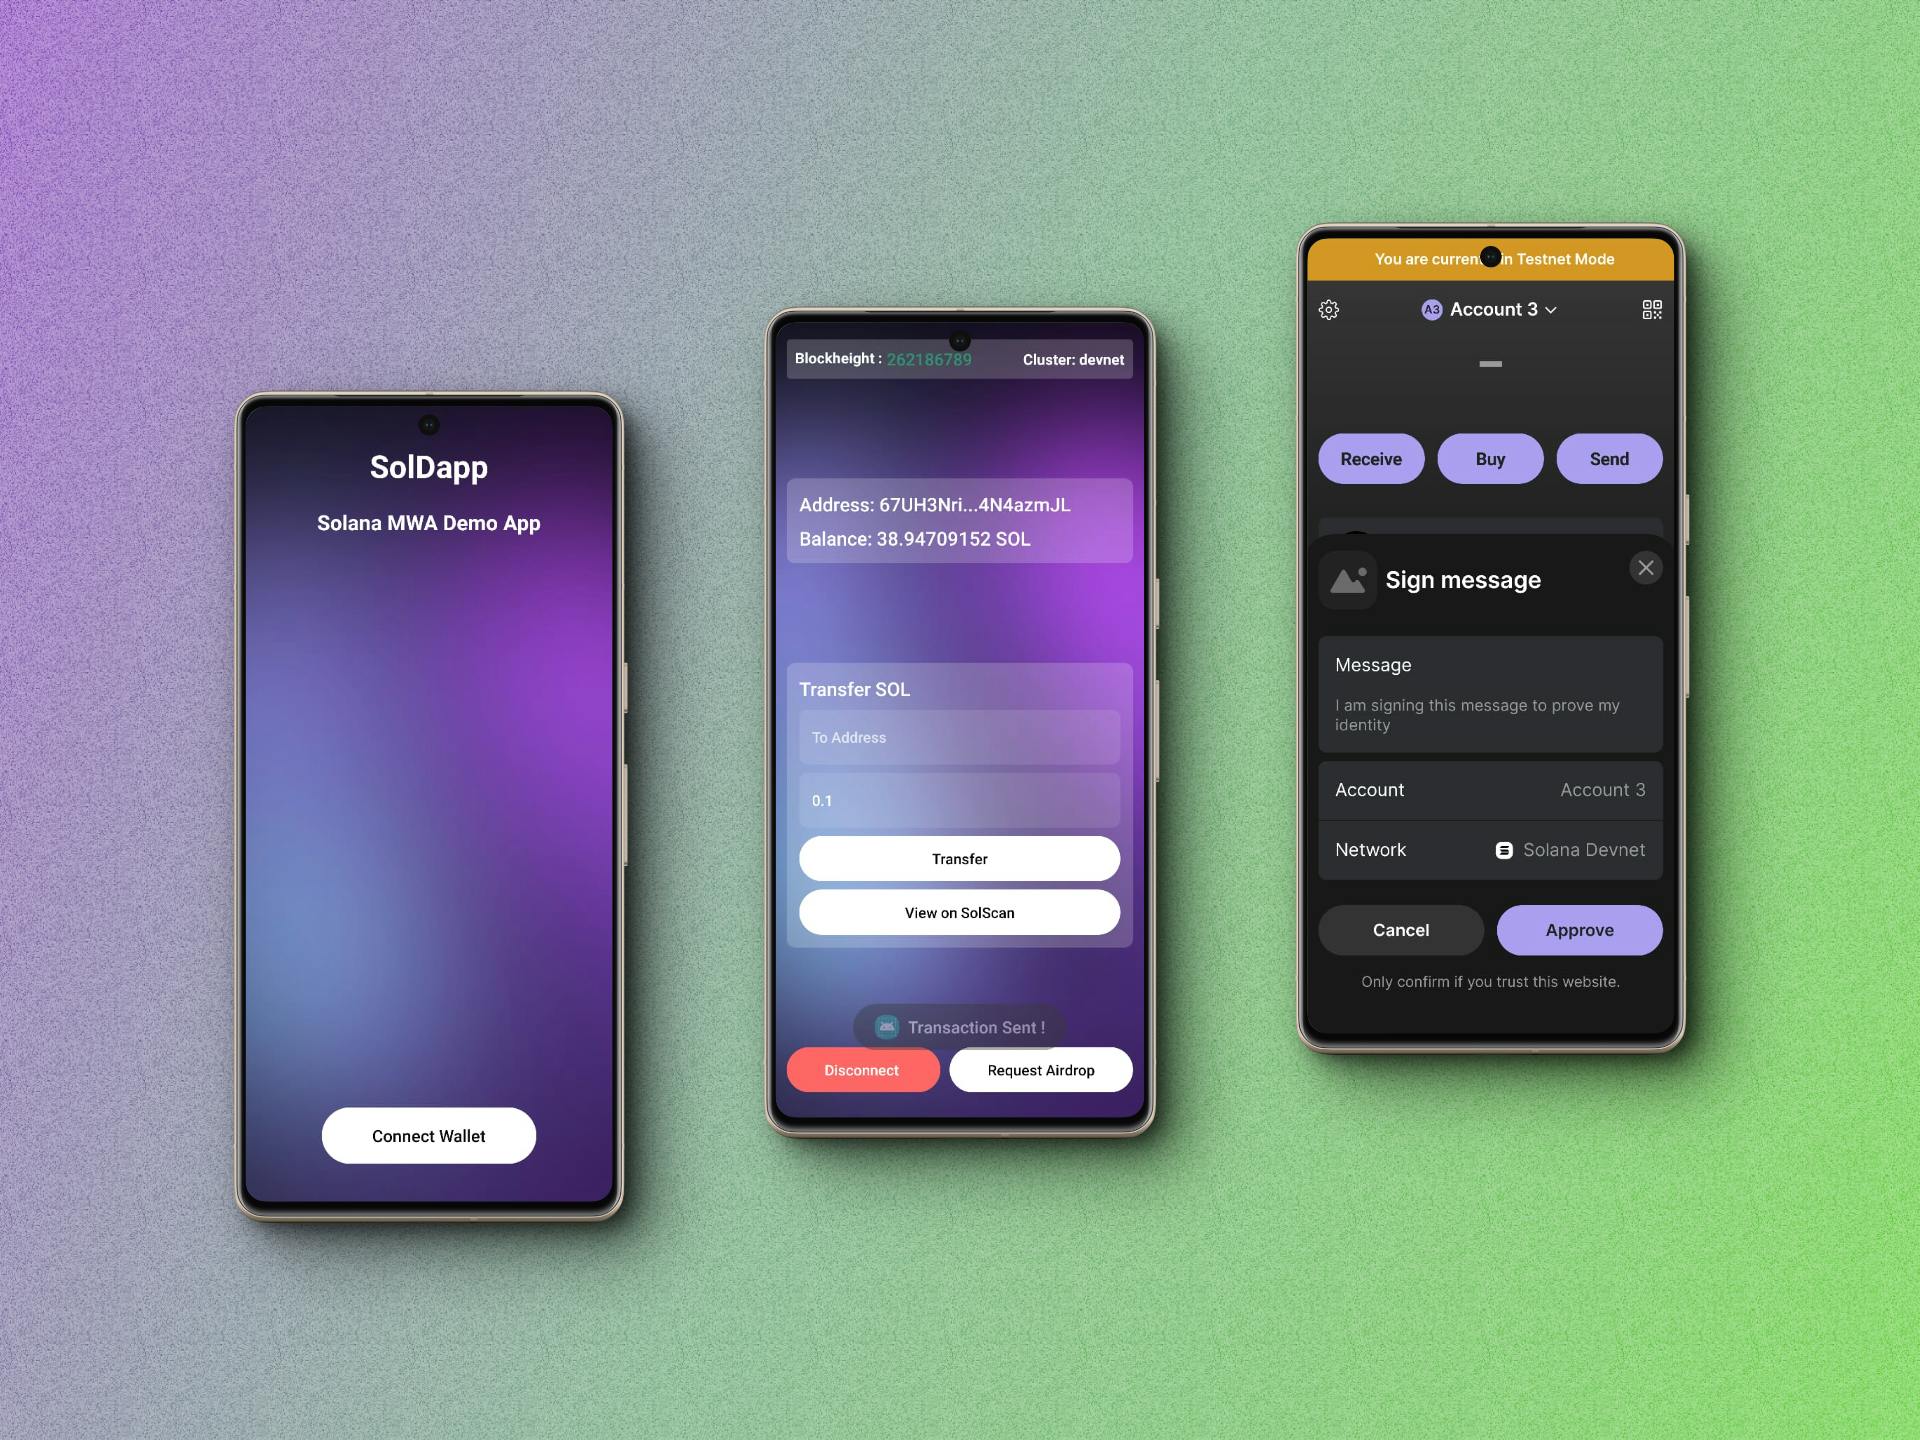
Here's the Flow of our App:
Connect Wallet Screen: User will be to connect their wallet
Sign Message: Implemented a sign message feature to enable users to sign messages as a means of identity verification or for interacting with decentralized applications (dApps).
Home: Here, We will display user's connected wallet address, the SOL balance, and different activities like
Request Test Faucet: Integrate a feature that allows users to request test SOL tokens from a faucet. This can be beneficial for testing and development purposes on the Solana devnet.
Direct Transfers: Enable users to perform direct transfers between their own addresses within the app. This feature can simplify the process of managing assets and funds for users.
Disconnect Wallet: Users will be able to disconnect the wallet
Block height details: Shows the current block height and displays the cluster to which user is connected
Setup
Open your terminal and run below commands.
git clone https://github.com/VIVEK-SUTHAR/SolMWARnApp.git
cd SolMWARnApp
This will clone the example app and change the current directory to cloned repository.
Now open your project with Your favourite code editor.Your project structure should look like this .
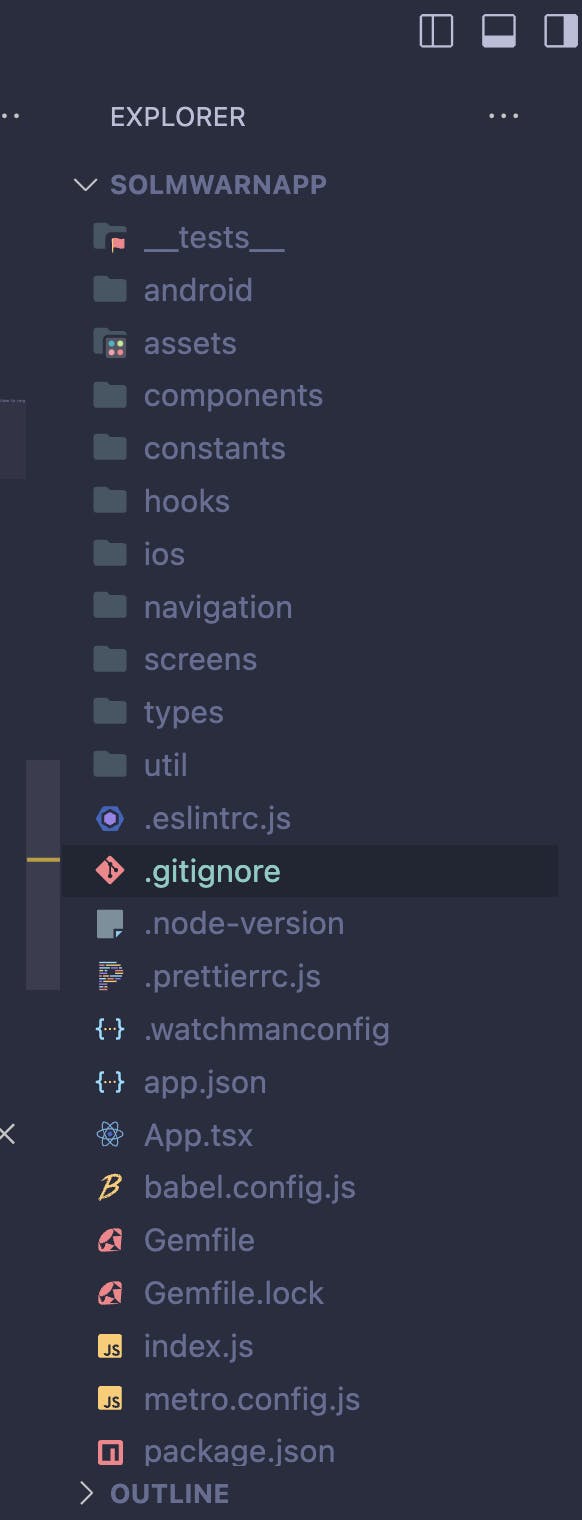
Feeling overwhelmed ? 🤔 Let's breakdown the project structure.
android: Our native code directory for android includingbuild.gradleandMainActivity.javaassets: Where we keep our assets like images and fontcomponents: Where we keep our Reusable React Componentsconstants: Here, we keep our constant like name and metadatahooks: Reusable logic as Custom React hooksnavigation: Where we define our navigation structures of the app.screens: Where we place our Screen files.types: types declaration is kept hereutils:Here, we keep the utility function, we we need very frequent
Now, You should have the basic idea of our project.
Let's See the overall structure of the App.
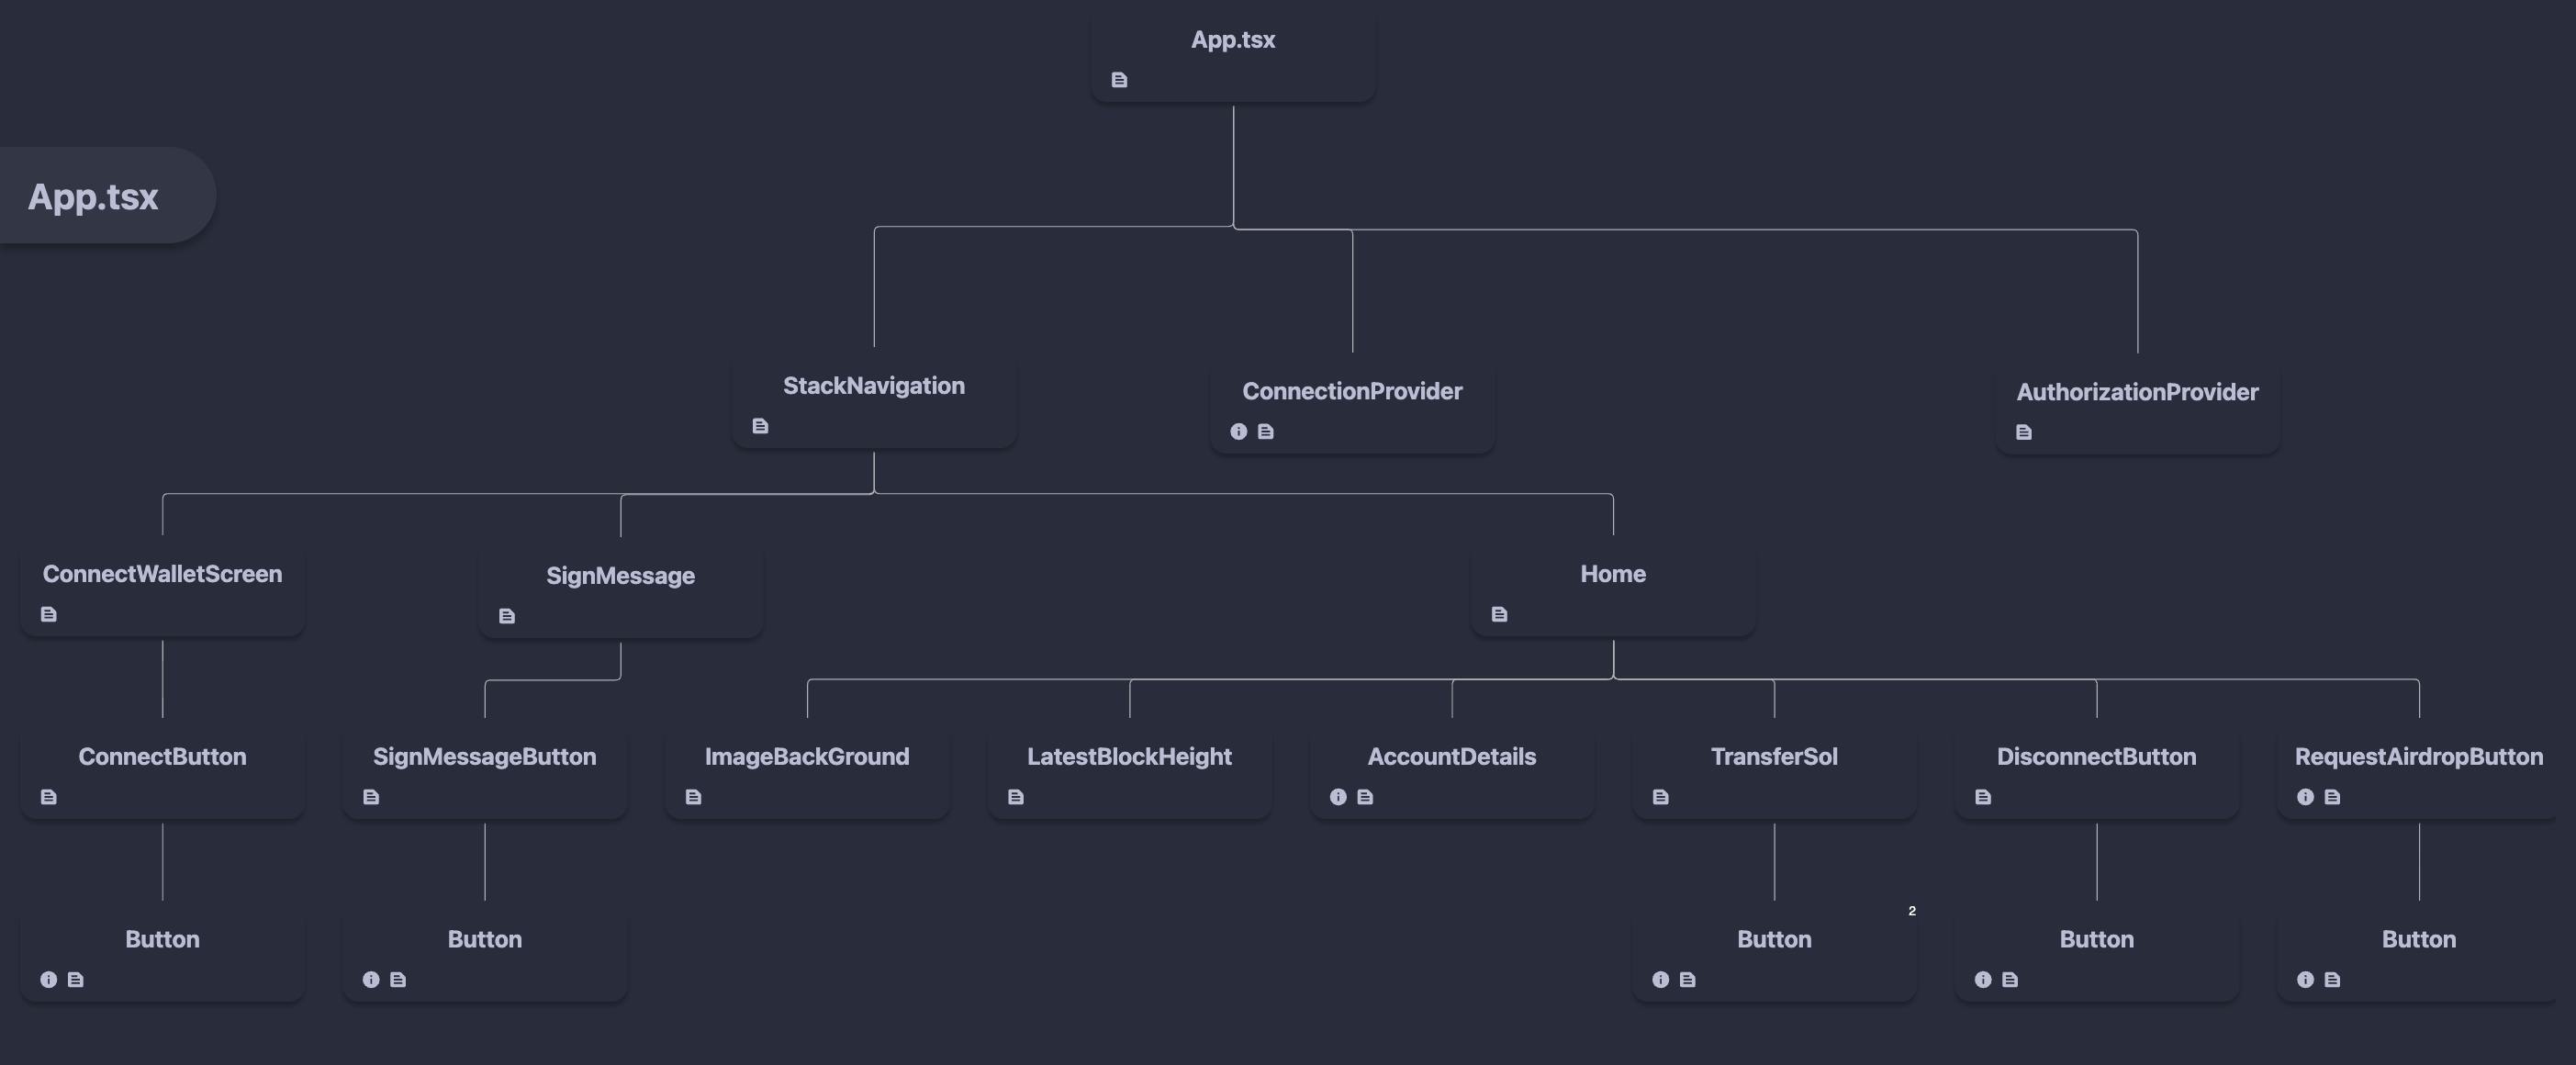
This is our Overall structure of the App.
App.tsx: Our Main App fileStackNavigation.tsx: Contains our screens likeConnectWallet,HomeandSignMessageWe also have two Contexts
AuthorizationProvider: It helps us to manage the Authorization with wallet and keep a global state of connected wallet detailsConnectionProvider: Provides us a connection instance ,via which we can interact with the Solana Nodes via JSON RPC.
Now Let's Understand AuthorizationProvider :
Don’t get overwhelmed , Let's under stand it by getting one function at a time .
export type Account = Readonly<{
  address: Base64EncodedAddress;
  label?: string;
  publicKey: PublicKey;
}>;
function getAccountFromAuthorizedAccount(account: AuthorizedAccount): Account {
  return {
    ...account,
    publicKey: getPublicKeyFromAddress(account.address),
  };
}
It takes :
account: expected to be of typeAuthorizedAccount. This suggests that the function is designed to work with an object that has the structure defined by theAuthorizedAccounttype.
It preserves all original properties and adds a
publicKeyobtained by callinggetPublicKeyFromAddresswith theaddressproperty.It returns an object whose type is Account
You might wonder what is getPublicKeyFromAddress , it's just a helper function, let's understand it.
function getPublicKeyFromAddress(address: Base64EncodedAddress): PublicKey {
  const publicKeyByteArray = toUint8Array(address);
  return new PublicKey(publicKeyByteArray);
}
The
getPublicKeyFromAddressfunction takes aBase64EncodedAddressas input and returns aPublicKey. It begins by converting the base64-encoded address into a byte array using thetoUint8Arrayfunction.toUint8Arrayis the utility function, which takes a base-64 encoded string and returns a Uint8Array.We have imported it fromjs-base64The final step involves creating a new
PublicKeyobject from the byte array.
type Authorization = Readonly<{
  accounts: Account[];
  authToken: AuthToken;
  selectedAccount: Account;
}>;

function getAuthorizationFromAuthorizationResult(
  authorizationResult: AuthorizationResult,
  previouslySelectedAccount?: Account,
): Authorization {
  let selectedAccount: Account;
  if (

    previouslySelectedAccount == null ||

    !authorizationResult.accounts.some(
      ({address}) => address === previouslySelectedAccount.address,
    )
  ) {
    const firstAccount = authorizationResult.accounts[0];
    selectedAccount = getAccountFromAuthorizedAccount(firstAccount);
  } else {
    selectedAccount = previouslySelectedAccount;
  }
  return {
    accounts: authorizationResult.accounts.map(getAccountFromAuthorizedAccount),
    authToken: authorizationResult.auth_token,
    selectedAccount,
  };
It takes two parameters:
authorizationResult: This is an object of typeAuthorizationResultand is a required parameter, and this type is imported from@solana-mobile/mobile-wallet-adapter-protocol,previouslySelectedAccount?: Account: This is an optional parameter of typeAccount. It represents an account that may have been previously selected.
Return Type:
Authorization- This indicates that the function is expected to return an object of type
Authorization.
- This indicates that the function is expected to return an object of type
Function Body:
Initially ,we are declaring a variable
selectedAccountof typeAccount.Then we are checking whether a
previouslySelectedAccountis provided and if it exists in the list ofauthorizationResultaccounts. If not, or if there was no previous selection, we are seetingselectedAccountto be the first account fromauthorizationResult, transformed into anAccountusing thegetAccountFromAuthorizedAccountfunction.If a
previouslySelectedAccountis found in the list, we setselectedAccountto be the providedpreviouslySelectedAccount.Then we constructs an object of type
Authorizationwith properties:accounts: An array ofAccountobjects obtained by mapping thegetAccountFromAuthorizedAccountfunction over all accounts inauthorizationResult.authToken: Theauth_tokenproperty fromauthorizationResult.selectedAccount: The determinedselectedAccount
Now, it time to move on next.
Interface Definition (AuthorizationProviderContext):
We are defining an interface named
AuthorizationProviderContext.Properties of
AuthorizationProviderContext:accounts: An array ofAccountobjects ornull.authorizeSession: A function that takes awalletparameter (which should have specific methods) and returns a Promise resolving to anAccount.deauthorizeSession: A function that takes awalletparameter and doesn't return anything (void).onChangeAccount: A function that takes anextSelectedAccountparameter (anAccount) and doesn't return anything.selectedAccount: AnAccountobject ornull.
Constant Definition (
DEFAULT_AUTHORIZATION_PROVIDER_ERROR_MESSAGE):- We are defining a string
DEFAULT_AUTHORIZATION_PROVIDER_ERROR_MESSAGEwith a default error message.
- We are defining a string
Context Creation (
AuthorizationContext):Here, we are creating a React context using
React.createContextfor theAuthorizationProviderContext.The default values for the context are provided as an object:
accountsis set tonull.The
authorizeSession,deauthorizeSession, andonChangeAccountfunctions are defined to throw an error with the default message.selectedAccountis set tonull.
Now time for our AuthorizationProvider :
function AuthorizationProvider(props: {children: ReactNode}) {
  const {children} = props;
  const [authorization, setAuthorization] = useState<Authorization | null>(
    null,
  );
  const handleAuthorizationResult = useCallback(
    async (
      authorizationResult: AuthorizationResult,
    ): Promise<Authorization> => {
      const nextAuthorization = getAuthorizationFromAuthorizationResult(
        authorizationResult,
        authorization?.selectedAccount,
      );
      setAuthorization(nextAuthorization);
      return nextAuthorization;
    },
    [authorization, setAuthorization],
  );


  const authorizeSession = useCallback(
    async (wallet: AuthorizeAPI & ReauthorizeAPI) => {
      const authorizationResult = await (authorization
        ? wallet.reauthorize({
            auth_token: authorization.authToken,
            identity: APP_METADATA,
          })
        : wallet.authorize({
            cluster: RPC_ENDPOINT,
            identity: APP_METADATA,
          }));
      return (await handleAuthorizationResult(authorizationResult))
        .selectedAccount;
    },
    [authorization, handleAuthorizationResult],
  );
  const deauthorizeSession = useCallback(
    async (wallet: DeauthorizeAPI) => {
      if (authorization?.authToken == null) {
        return;
      }
      await wallet.deauthorize({auth_token: authorization.authToken});
      setAuthorization(null);
    },
    [authorization, setAuthorization],
  );
  const onChangeAccount = useCallback(
    (nextSelectedAccount: Account) => {
      setAuthorization(currentAuthorization => {
        if (
          !currentAuthorization?.accounts.some(
            ({address}) => address === nextSelectedAccount.address,
          )
        ) {
          throw new Error(
            `${nextSelectedAccount.address} is not one of the available addresses`,
          );
        }
        return {
          ...currentAuthorization,
          selectedAccount: nextSelectedAccount,
        };
      });
    },
    [setAuthorization],
  );
  const value = useMemo(
    () => ({
      accounts: authorization?.accounts ?? null,
      authorizeSession,
      deauthorizeSession,
      onChangeAccount,
      selectedAccount: authorization?.selectedAccount ?? null,
    }),
    [authorization, authorizeSession, deauthorizeSession, onChangeAccount],
  );

  return (
    <AuthorizationContext.Provider value={value}>
      {children}
    </AuthorizationContext.Provider>
  );
}
Let's break down in pieces and understand it.
 const {children} = props;
  const [authorization, setAuthorization] = useState<Authorization | null>(
    null,
  );
Initially , we are destructuring the props and geting children
Then we initialised a state called authorization, whose type is Authorization or null
const handleAuthorizationResult = useCallback(
    async (
      authorizationResult: AuthorizationResult,
    ): Promise<Authorization> => {
      const nextAuthorization = getAuthorizationFromAuthorizationResult(
        authorizationResult,
        authorization?.selectedAccount,
      );
      setAuthorization(nextAuthorization);
      return nextAuthorization;
    },
    [authorization, setAuthorization],
  );
The function handleAuthorizationResult is a memoized function, created using useCallback.
It takes an
authorizationResultof typeAuthorizationResult.Then we are using
getAuthorizationFromAuthorizationResultto derive the next authorization state based on the result.After it we are updating the state using
setAuthorizationand returns the next authorization.
 const authorizeSession = useCallback(
    async (wallet: AuthorizeAPI & ReauthorizeAPI) => {
      const authorizationResult = await (authorization
        ? wallet.reauthorize({
            auth_token: authorization.authToken,
            identity: APP_METADATA,
          })
        : wallet.authorize({
            cluster: RPC_ENDPOINT,
            identity: APP_METADATA,
          }));
      return (await handleAuthorizationResult(authorizationResult))
        .selectedAccount;
    },
    [authorization, handleAuthorizationResult],
  );
The function authorizeSession is a memoized function, created using useCallback.
This function handles the authorization process.
Calls either
wallet.reauthorizeorwallet.authorizebased on whether there is an existing authorization.Calls
handleAuthorizationResultto update the state and returns the selected account.
 const deauthorizeSession = useCallback(
    async (wallet: DeauthorizeAPI) => {
      if (authorization?.authToken == null) {
        return;
      }
      await wallet.deauthorize({auth_token: authorization.authToken});
      setAuthorization(null);
    },
    [authorization, setAuthorization],
  );
The function deauthorizeSession is a memoized function, created using useCallback.
This function handles the deauthorization process.
Checks if there is a valid authorization with an auth token before calling
wallet.deauthorize.Sets the authorization state to
nullafter deauthorization.
const onChangeAccount = useCallback(
    (nextSelectedAccount: Account) => {
      setAuthorization(currentAuthorization => {
        if (
          !currentAuthorization?.accounts.some(
            ({address}) => address === nextSelectedAccount.address,
          )
        ) {
          throw new Error(
            `${nextSelectedAccount.address} is not one of the available addresses`,
          );
        }
        return {
          ...currentAuthorization,
          selectedAccount: nextSelectedAccount,
        };
      });
    },
    [setAuthorization],
  );
The function onChangeAccount is a memoized function, created using useCallback.
Updates the selected account in the authorization state.
Throws an error if the provided account is not part of the available addresses.
 const value = useMemo(
    () => ({
      accounts: authorization?.accounts ?? null,
      authorizeSession,
      deauthorizeSession,
      onChangeAccount,
      selectedAccount: authorization?.selectedAccount ?? null,
    }),
    [authorization, authorizeSession, deauthorizeSession, onChangeAccount],
  );
Memoizes the context value to avoid unnecessary renders.
Contains information such as accounts, authorization and deauthorization functions, and the selected account.
return (
    <AuthorizationContext.Provider value={value}>
      {children}
    </AuthorizationContext.Provider>
  );
It Provides the context value to its childrens.
Wraps the
childrenwith the context provider.
const useAuthorization = () => React.useContext(AuthorizationContext);

export {AuthorizationProvider, useAuthorization};
const useAuthorization = () => React.useContext(AuthorizationContext);We defined a custom hook named
useAuthorization.It utilizes the
useContexthook from React to retrieve the current value of theAuthorizationContext.This hook is designed to be used within functional components to access the authorization-related information provided by the
AuthorizationProvider.
So it was all about
It's time for ConnectionProvider:
export interface ConnectionProviderProps {
  children: ReactNode;
  endpoint: string;
  config?: ConnectionConfig;
}

export const ConnectionProvider: FC<ConnectionProviderProps> = ({
  children,
  endpoint,
  config = {commitment: 'confirmed'},
}) => {
  const connection = useMemo(
    () => new Connection(endpoint, config),
    [endpoint, config],
  );

  return (
    <ConnectionContext.Provider value={{connection}}>
      {children}
    </ConnectionContext.Provider>
  );
};

export interface ConnectionContextState {
  connection: Connection;
}

export const ConnectionContext = createContext<ConnectionContextState>(
  {} as ConnectionContextState,
);

export function useConnection(): ConnectionContextState {
  return useContext(ConnectionContext);
}
ConnectionProvider Component:
The
ConnectionProvidercomponent takes inchildren,endpoint(Solana RPC endpoint), and an optionalconfigobject as props.It uses the
useMemohook to create a new SolanaConnectionobject. This object is initialized with the providedendpointand optionalconfig.The
Connectionobject is then wrapped within theConnectionContext.Provider, making it accessible to the components in the component tree underneath.The
children(nested components) are rendered within this provider, allowing them to access the Solana connection through the context.
ConnectionContext State and Provider:
The
ConnectionContextStateinterface defines the structure of the context state, which includes aconnectionproperty holding the SolanaConnectionobject.The
ConnectionContextis created usingcreateContext, initialized with an empty object as the default value.The
ConnectionProvidersets thevalueof the context provider to an object containing theconnectionproperty with the SolanaConnectionobject.
useConnection Hook:
The
useConnectionfunction is a custom hook that utilizesuseContextto retrieve the current context value.It returns the
ConnectionContextState, providing components with access to the SolanaConnectionobject.
Now you should have the basic idea how wallet authorization works.If you don’t get it, go through it 2-3 times and try to simulate flow, Even I had a hard time in the first shot, so don’t worry, eventually you will get it.
This 2 was our main function that manages the connection and authorization.
Now Let's see how the ConnectWallet uses this to connect our DApp with the wallet.
const handleConnectPress = useCallback(async () => {
    try {
      if (authorizationInProgress) {
        return;
      }
      setAuthorizationInProgress(true);
      await transact(async wallet => {
        await authorizeSession(wallet);
      });
    } catch (err: any) {
      ToastAndroid.show('Failed to connect wallet', ToastAndroid.SHORT);
    } finally {
      setAuthorizationInProgress(false);
    }
  }, [authorizationInProgress, authorizeSession, selectedAccount]);
This function is triggered when user presses our ConnectWalle button
It first checks if an authorization process is already in progress and, if so, exits early to avoid concurrent requests.
If not, it sets the
authorizationInProgressstate totrueto indicate the initiation of the authorization process.It then utilizes the
transactfunction, presumably handling transactions, and within this transactional context, it calls theauthorizeSessionfunction to initiate or reauthorize the wallet session. Note thattransactis coming from@solana-mobile/mobile-wallet-adapter-protocol-web3js,which takes one argument and it it the wallet.If any errors occur during the process, a toast notification is displayed indicating the failure to connect the wallet. Finally, regardless of success or failure, it sets
authorizationInProgressback tofalse.
You should’ve got this, if not follow the approach I given early 😅.
Now Let's understand the SignMessage function in SignMessageButton
 const signMessage = useCallback(
    async (messageBuffer: Uint8Array) => {
      return await transact(async (wallet: Web3MobileWallet) => {
        const authorizationResult = await authorizeSession(wallet);
        const signedMessages = await wallet.signMessages({
          addresses: [authorizationResult.address],
          payloads: [messageBuffer],
        });

        return signedMessages[0];
      });
    },
    [authorizeSession],
  );
First we are converting our message into an
Uint8Array, and then thesignMessagefunction is called to handle the signing process.The
signMessagefunction, First, it authorizes or reauthorizes the wallet session using theauthorizeSessionfunction. Then, it utilizes thesignMessagesmethod on the wallet object to sign the provided message buffer using the address associated with the authorized account.If the signing process is successful, then we are navigating to the
Homescreen, indicating a successful connection or authorization.
Now Let's Understand the TransferSol function.
const signTransaction = useCallback(async () => {
    try {
      if (signingInProgress) {
        return;
      }
      setSigningInProgress(true);
      const txn = await transact(async (wallet: Web3MobileWallet) => {
        const [authorizationResult, latestBlockhash] = await Promise.all([
          authorizeSession(wallet),
          connection.getLatestBlockhash(),
        ]);
        Logger.Success('Authorized!');

        const randomTransferTransaction = new Transaction({
          ...latestBlockhash,
          feePayer: authorizationResult.publicKey,
        }).add(
          SystemProgram.transfer({
            fromPubkey: authorizationResult.publicKey,
            toPubkey: new PublicKey(toAddress),
            lamports: solAmmount,
          }),
        );

        const signedTransactions = await wallet.signTransactions({
          transactions: [randomTransferTransaction],
        });
        Logger.Success('Signed!', signedTransactions[0]);
        return signedTransactions[0];
      });

      Logger.Log('Serialized transaction: ' + txn.serialize());
      Logger.Log('Sending transaction...');
      const signature = await connection.sendRawTransaction(txn.serialize());
      Logger.Success('Sent! Txn Hash', signature);
      setTxnHash(`https://solscan.io/tx/${signature}?cluster=devnet`);
      ToastAndroid.show('Transaction Sent !', ToastAndroid.SHORT);
    } catch (error) {
      Logger.Error('Error in Sending Txn', error);
    } finally {
      setSigningInProgress(false);
      setSolAmmount(LAMPORTS_PER_SOL / 2);
      setToAddress('');
    }
  }, [authorizeSession, connection, solAmmount, signingInProgress]);
Here's the breakdown:
This function, signTransaction, is designed to handle the signing and submission of a transaction in a Solana blockchain-based mobile application. Here's a breakdown of its functionality:
Initial Checks: The function begins by checking if a transaction signing process is already in progress (
signingInProgress). If it is, the function exits early to prevent concurrent signing attempts.Setting Signing in Progress: If no signing process is in progress, the function sets the
signingInProgressstate totrueto indicate the initiation of the signing process.Transaction Authorization and Blockhash Retrieval: The function then initiates a transaction using the
transactfunction, which involves authorizing or reauthorizing the wallet session (authorizeSession). Additionally, it fetches the latest block-hash from usingconnection.getLatestBlockhash()method.Transaction Construction and Signing:
With the authorization result and the latest blockhash, the function constructs a transaction. In this case, it's a transfer transaction transferring a specified amount of SOL (
solAmount) to a specified recipient (toAddress).The transaction is signed using the
wallet.signTransactionsmethod, obtaining a signed transaction object.
Transaction Submission:
- The serialized transaction is then sent to the Solana blockchain using the
connection.sendRawTransactionmethod, and the resulting transaction signature is logged.
- The serialized transaction is then sent to the Solana blockchain using the
Logging and UI Updates:
Various log messages are output using a Logger utility, indicating the success of authorization, signing, and transaction submission.
The transaction hash is formatted for viewing on SolScan, and a toast notification is displayed indicating that the transaction has been sent.
Cleanup:
- Finally, whether the transaction was successful or encountered an error, the function sets
signingInProgressback tofalse. Additionally, it resets the SOL amount (solAmount) and the recipient address (toAddress).
- Finally, whether the transaction was successful or encountered an error, the function sets
Now, we have covered the almost main functions and the logic, rest is just a UI and some styling , which I leave upon you .
Now Let's run the app and see it in action.
In the VS Code or your editor, open terminal and run below command
yarn install
#
npm install
This will install all the dependencies required by our app.
Once it's done.
Make sure your device is connected to your computer and USB Debugging is enabled,Alternatively if your pc and phone is on same WiFi network, you can use the WiFi debugging to run your app physically.
Now run below command.
yarn android
This command will build a debug build of our app, bundles our JS code, starts the local server and runs our app.
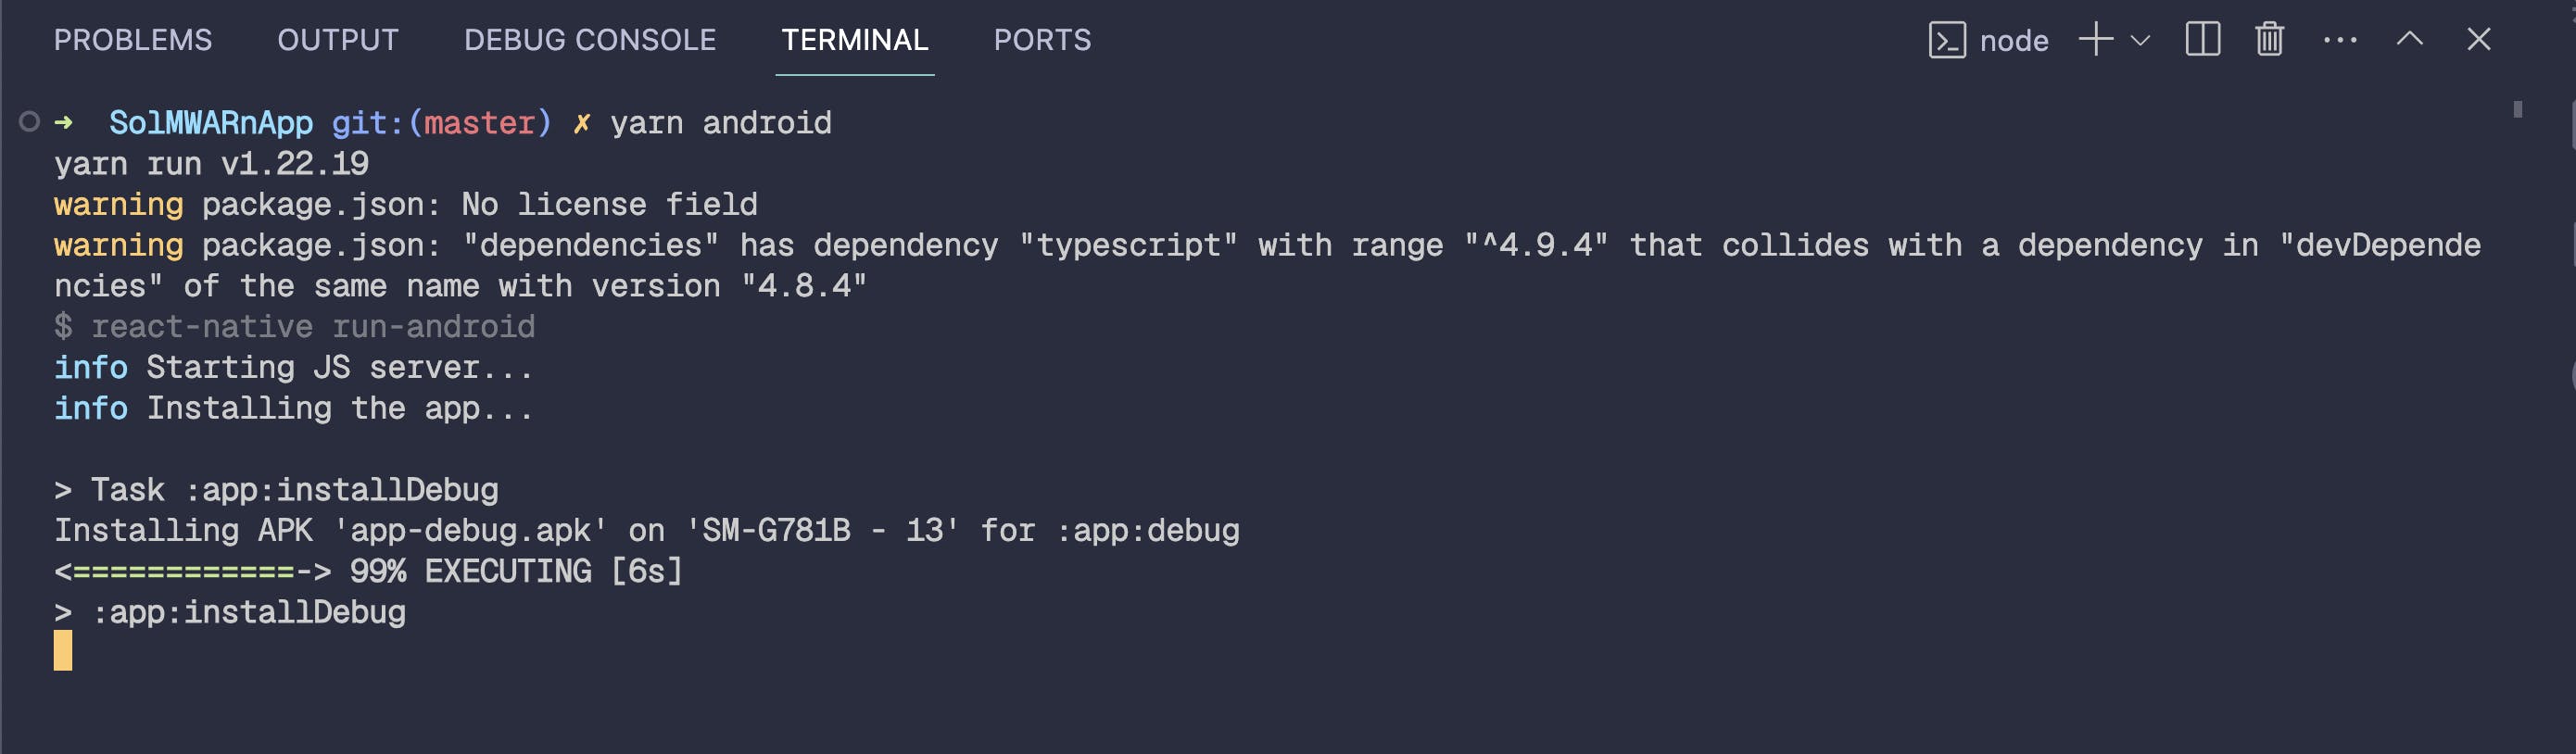
If you followed the pre requirements and set up your environment , the app will build and will be ready to test.
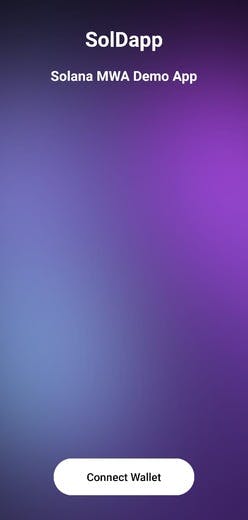
Here's the output how the first screen will look like.
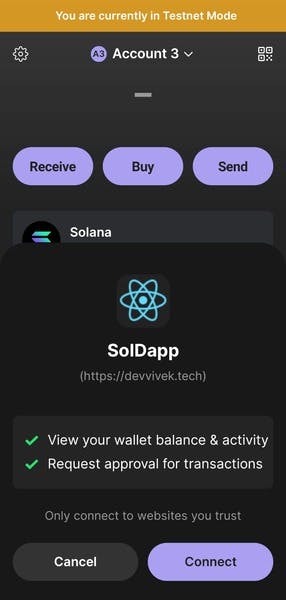
Once you click the Connect Wallet, you will be prompted in your wallet to connect our DApp just like below.
Now your app is up and running, try out sign message, request some test faucet and try to transfer to your another address straight forward from your app, you cal also change the UI and make it more user friendlier .Possibilities are endless, it up to you and your creativity .
Now you a have idea of What Solana Mobile Stack is, how to build an App with it using React Native and handle connections with Wallet and sending transactions.
This is all about Solana Mobile Stack, but there are also other developer tools available. Here's the list
Solana Pay for Android: The Solana Pay protocol was developed independently of the Solana Mobile Stack, but combining payments with a mobile device is a natural fit for Solana Pay.
CandyPay : CandyPay is a low-code checkout solution built on Solana, they also have the Android SDK available to integrate with your app.
Saganize : Saganize enables in-app transactions for Solana Mobile dApps, allowing users to interact with transactions within their app, without the need to build a separate wallet infrastructure.
Also, if you are interested in Learning Solana, Here's the resources that can help you
Solana Official Docs : The official Solana Documentation
Solana CookBook : The Solana Cookbook is a developer resource that provides the essential concepts and references for building applications on Solana.
Solana Core by Buildspace : It'a a 6 week long course offered by Buildspace
Rust Book (Rust is official programming language of Solana)
Anchor (A Framework for building, testing and deploying Solana Programs)
If you enjoyed this blog, please consider sharing it on your social media. Your support motivates me to create more content like this! Sharing helps others discover valuable insights and builds a supportive community of learners and developers.
In the next part, we will see how we can interact with the Custom Solana Program and see from deploying a program to integrating in the App.
Thank you for being part of this journey with me.
Until Next Time,
Keep Coding, Keep Debugging.
See you in next blog 👋
Reference :