Build your first Web 3.0 Application with HTML, CSS, JavaScript, and Remix-IDE.
Build your first DApp with HTML, CSS, and Vanilla JS


So if you are starting your Web3.0 journey, understanding all the concepts by building the projects is the best thing you can do.
In this blog, we are going to build a simple App: Chain-Journey, it is going to be an application where users will drop a message about what they are learning and it will be stored on the blockchain and everyone can see what others are learning.
For this application, our tech-stack is
For Front-end
HTML
CSS
JavaScript
-For Smart-Contract we are using Solidity
-We will be using Ethers.JS for interacting with our smart contract.
Setup
Open your terminal and run the below command
mkdir Chain-Journey
cd Chain-Journey
Now open this folder in VS Code or your code Editor
After that make a file with the name index.html.
After this, make a file with the name style.css.
Now make another file named interact.js, in this file we are writing all of our logic.
So our Setup for the front-end is done.
Writing Smart-Contract
Before writing smart-contract let's understand what is smart-contract
A "smart contract" is simply a program that runs on the Ethereum blockchain. It's a collection of code (its functions) and data (its state) that resides at a specific address on the Ethereum blockchain.
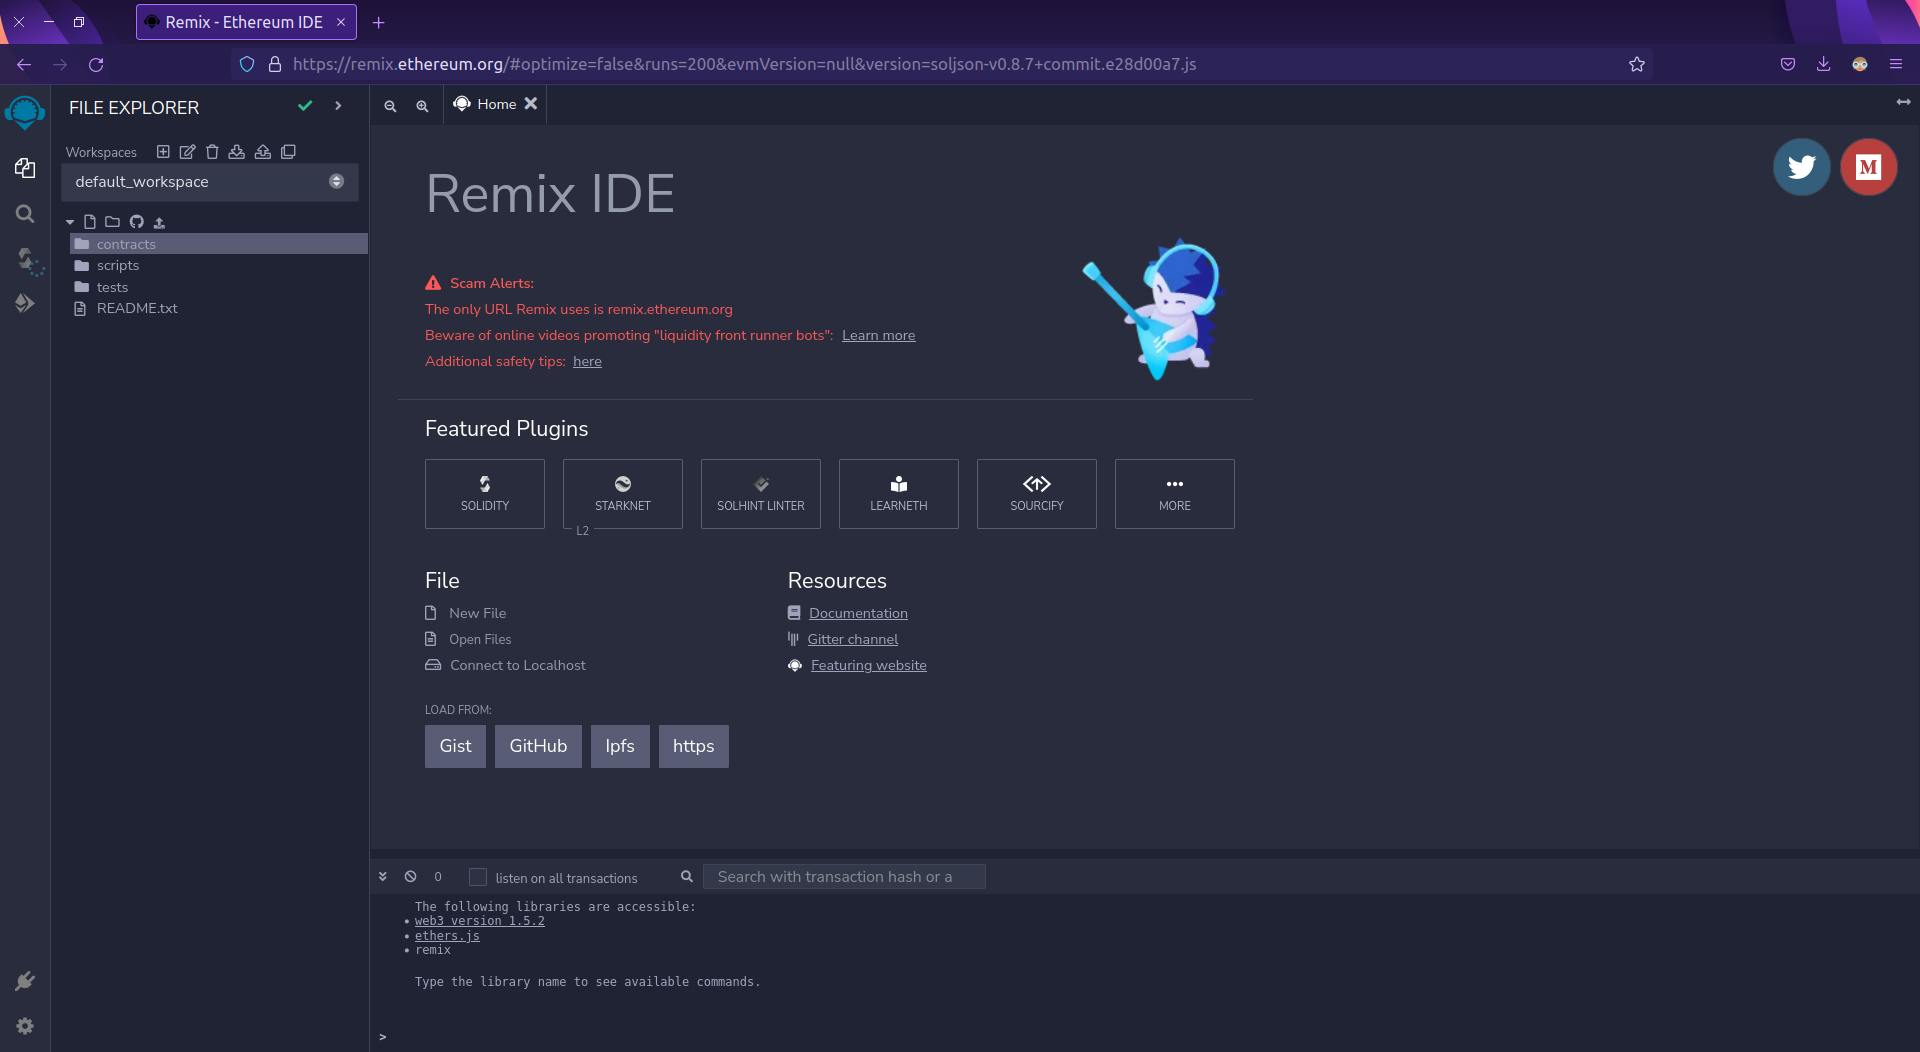
For writing smart-contract, we are going to use Remix-IDE, Remix is an online, Web-based IDE for writing, compiling, testing, and deploying the Smart-Contract.
Just go to Remix-IDE
You should see the screen like this
Now from File-explorer Click on + Icon to create a new workspace and in the modal leave the Workspace name as default . Choose a template Select Blank and hit enter.
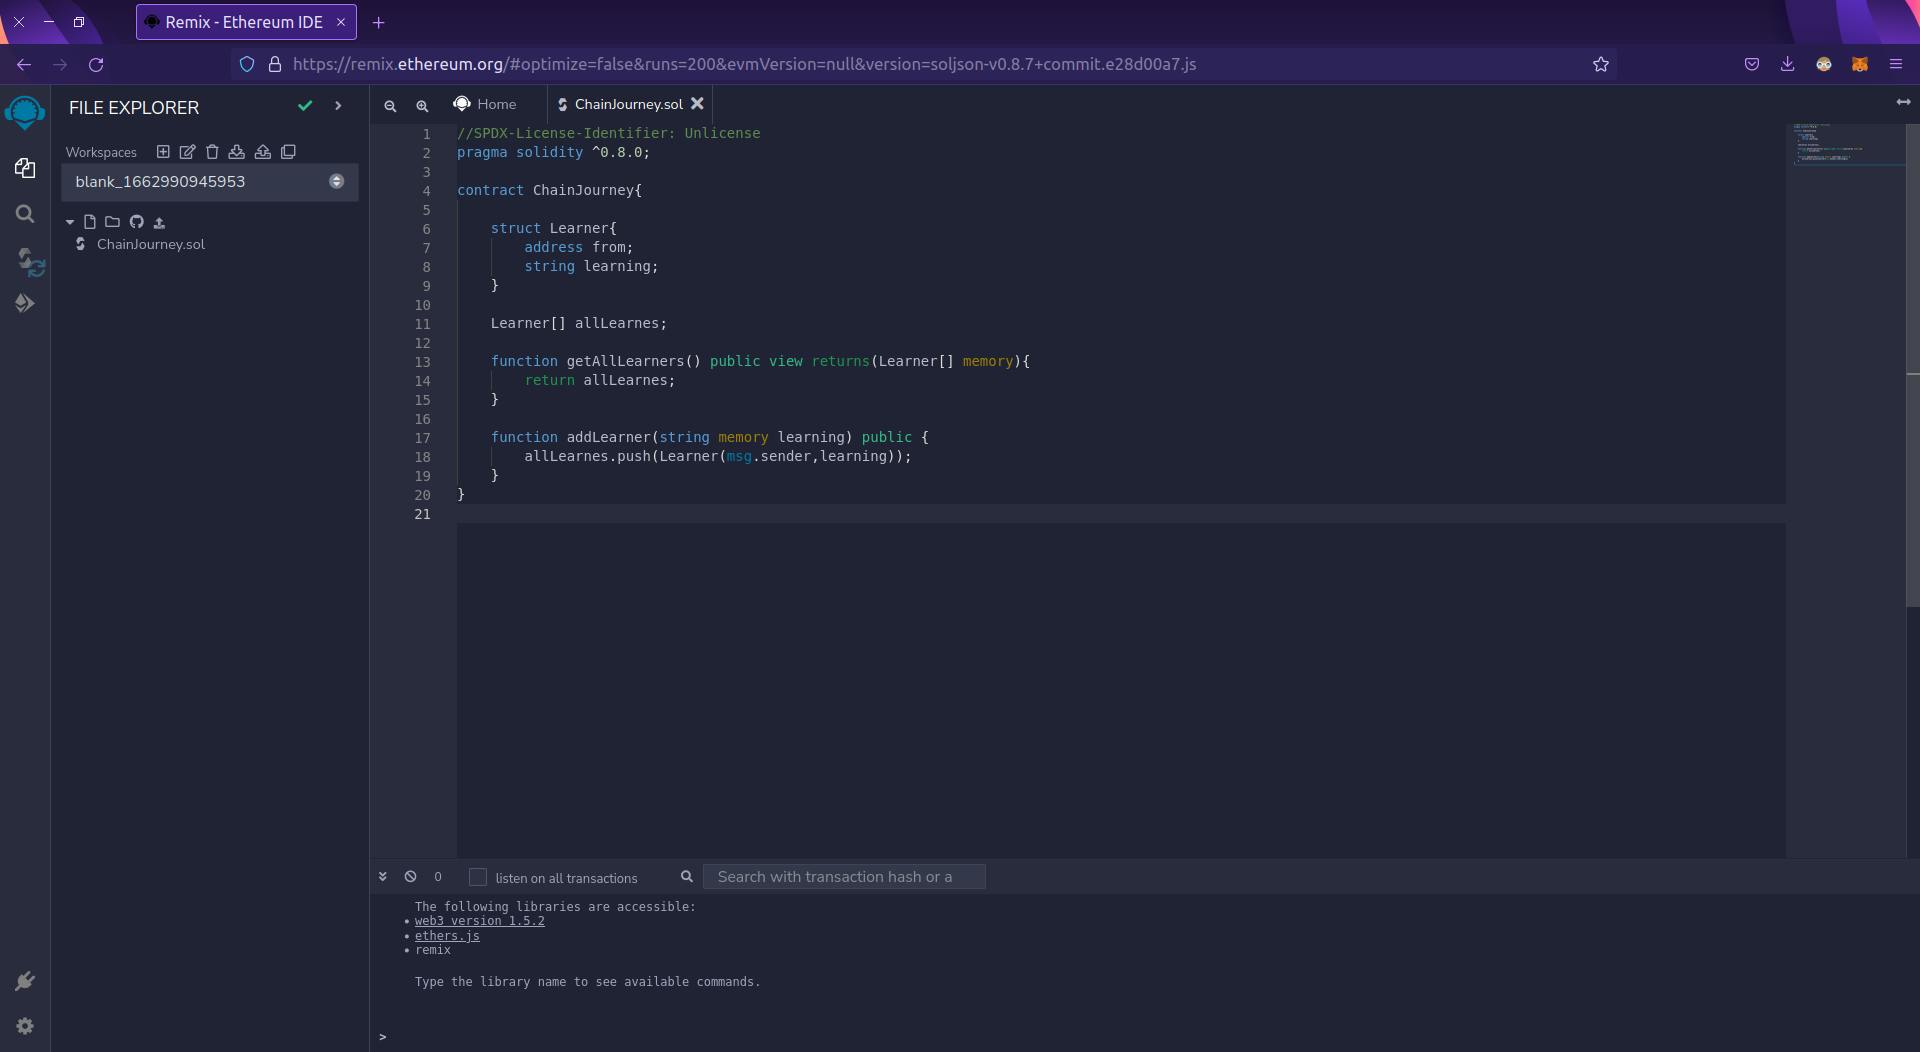
Now from the file explorer click on File-Icon and Enter the file name ChainJourney.sol.
Now in ChainJourney.sol paste the below code.
This is our code which we will deploy on the blockchain.
//SPDX-License-Identifier: Unlicense
pragma solidity ^0.8.0;

contract ChainJourney{

    struct Learner{
        address from;
        string learning;
    }

    Learner[] allLearnes;

    function getAllLearners() public view returns(Learner[] memory){
        return allLearnes;
    }

    function addLearner(string memory learning) public {
        allLearnes.push(Learner(msg.sender,learning));
    }
}
So Let's understand our code line-by-line:
//SPDX-License-Identifier: Unlicense
pragma solidity ^0.8.0;
The first line is a comment defining our license of the program and the second line declares that what solidity version we are using.
Note that the symbol ^0.8.0 defines that our program is compatible with a solidity version greater than 0.8.0
Solidity is a contract-oriented language, So our code resides in the contract ChainJourney{}
Here ChainJourney is the contract name.
struct Learner{
        address from;
        string learning;
    }
Sometimes we need our own data type. In Solidity struct is a keyword used to define custom data types. Here we are defining the struct with the name Learner.
Inside this struct, we are having two members
address from: address is data-type in the solidity that represents the public address of the user.string learning: it's a simple string storing what the user is learning.
Learner[] alllearners;
Here, We are declaring an array of type Learner, this array will store all the user's address and what they are learning.
function getAllLearners() public view returns(Learner[] memory){
       return allLearnes;
   }
Now we are declaring a function named getAllLearners
Let's understand what is the meaning of public, view, and returns.
public: Basically this function is public and can be called by anyoneview: In Solidity, a view function is the function that does not changes the state of the contract.returns: Here, we are defining what our function is going to return, in our case the functiongetAllLearnersis returning an array type of Learner.
function addLearner(string memory learning) public {
       allLearnes.push(Learner(msg.sender,learning));
   }
Here we have another function named addLearner.
When we want to add any user's data to the blockchain we will call this function.
Our function takes an argument learning whose type is a string.
Inside our function, we are pushing the incoming data in the allLearners array by calling the push method.
Deploying the Smart Contract
Now our contract is ready.
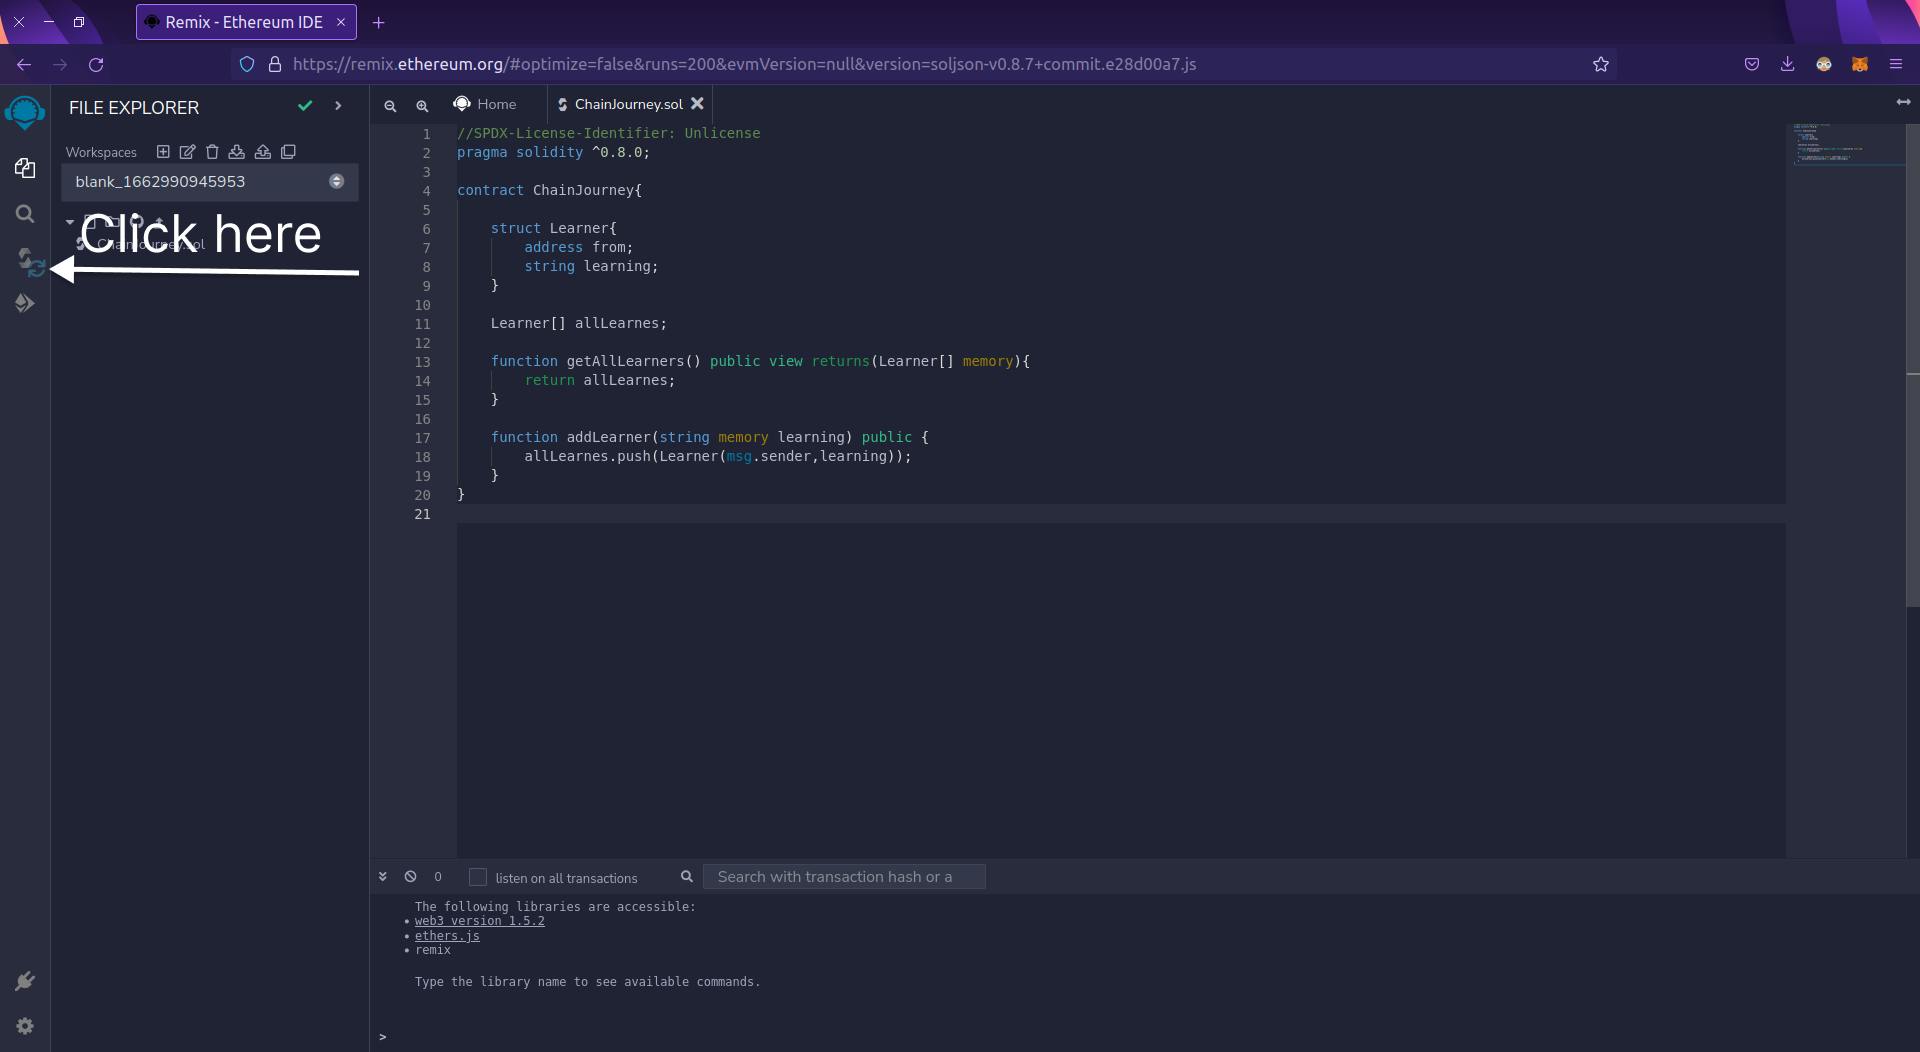
At this point, your screen should look like this
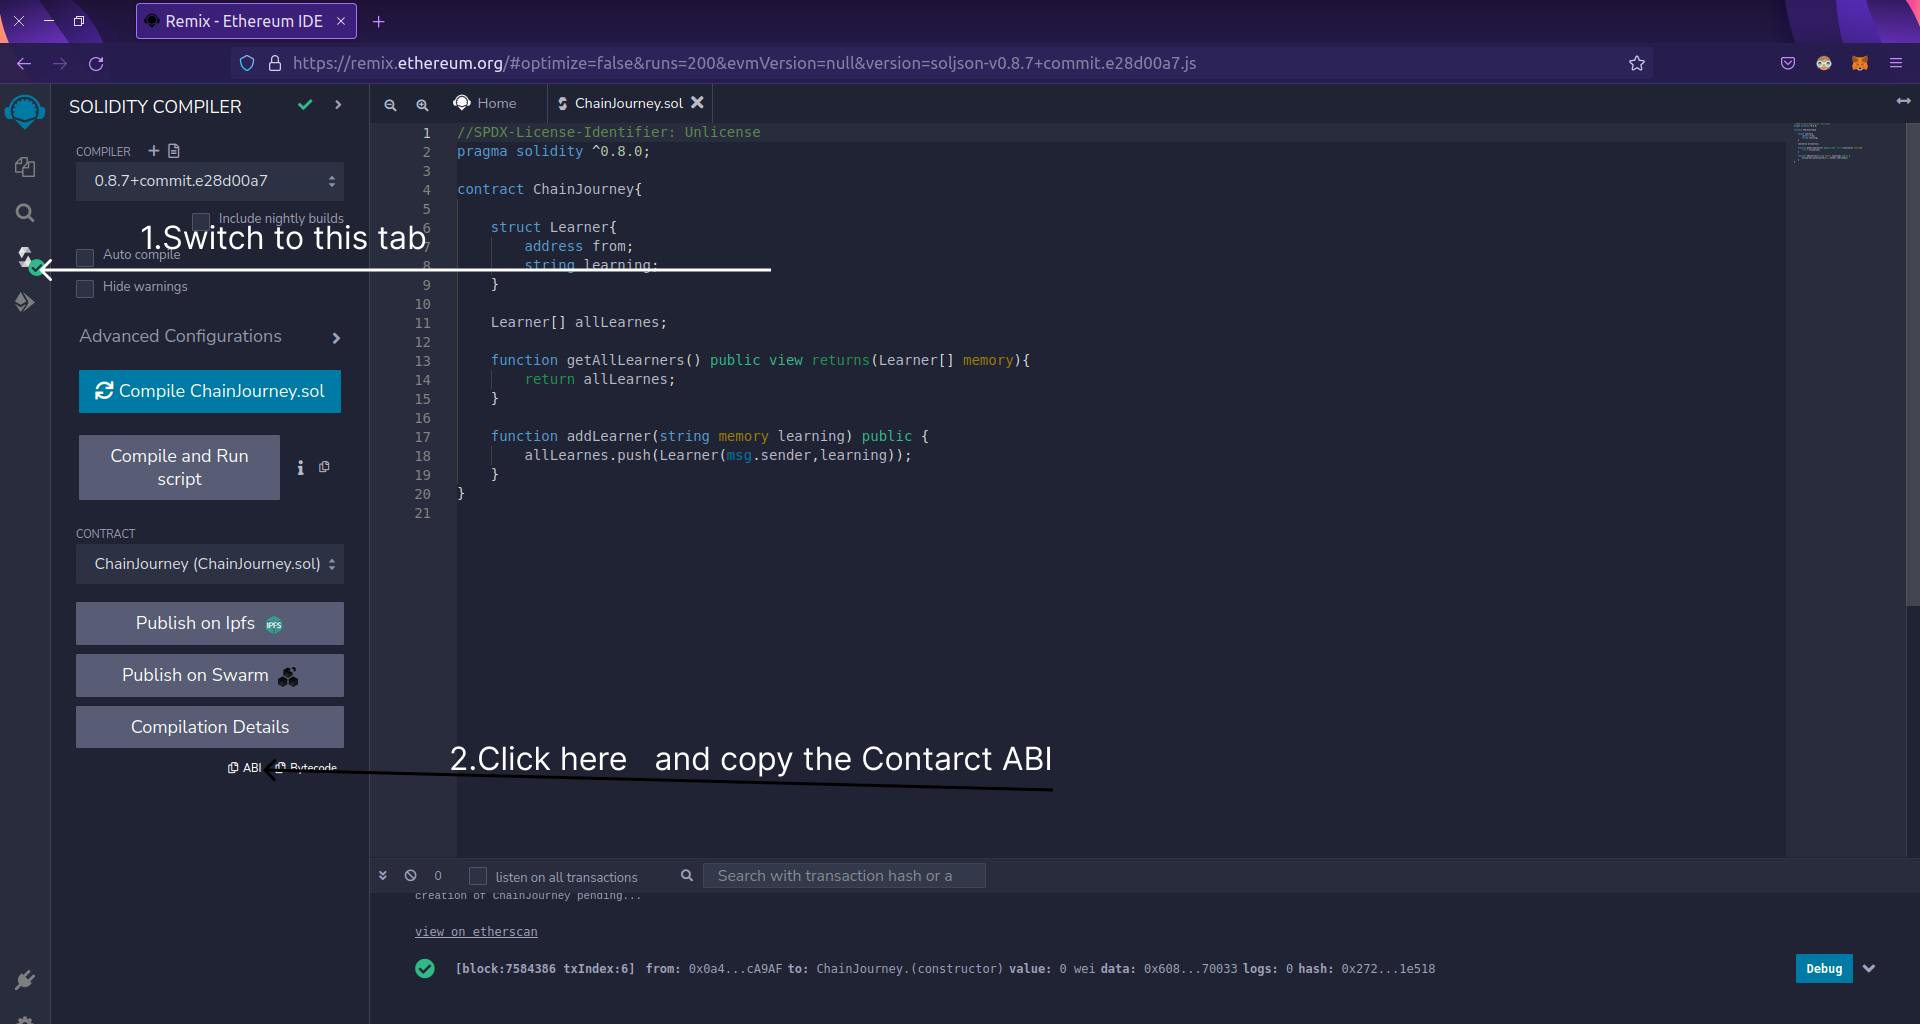
Now Click on Compile Tab
Here click on complete ChainJourney.sol and should see the green tick.
Now Our Contract is ready for deployment on blockchain
Here we are deploying our contract on Ethereum's Goerli Testnet.
Make sure you are on Goerli Testnet before deploying the Contract.
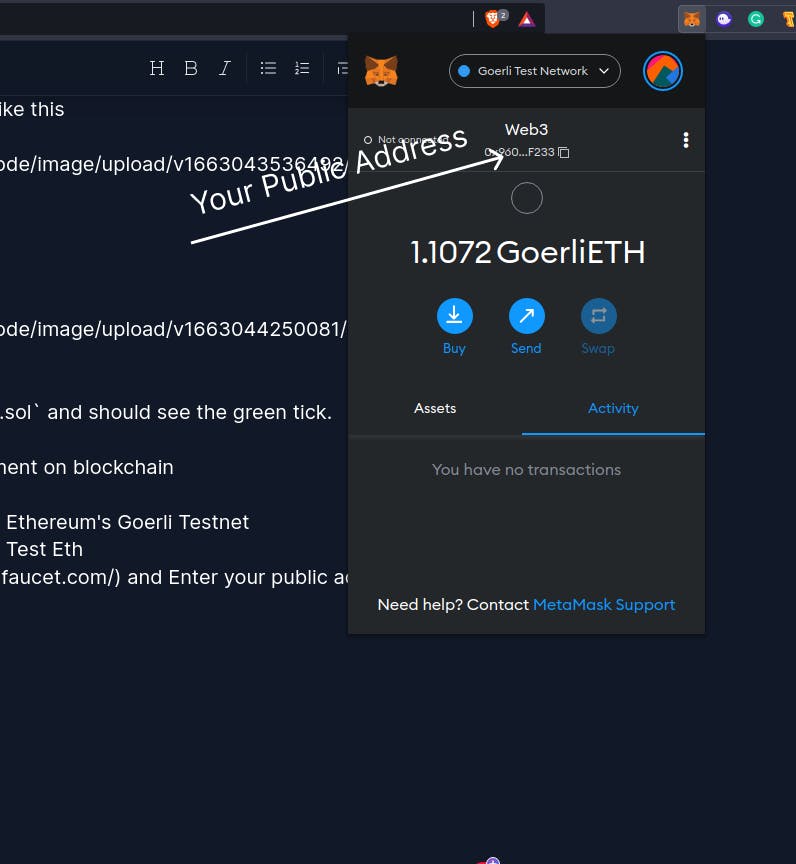
For this, you need to have some Goerli Test Eth.
Just go to GoerliFaucet and Enter your public address and get some test eth.
You can find your public address here
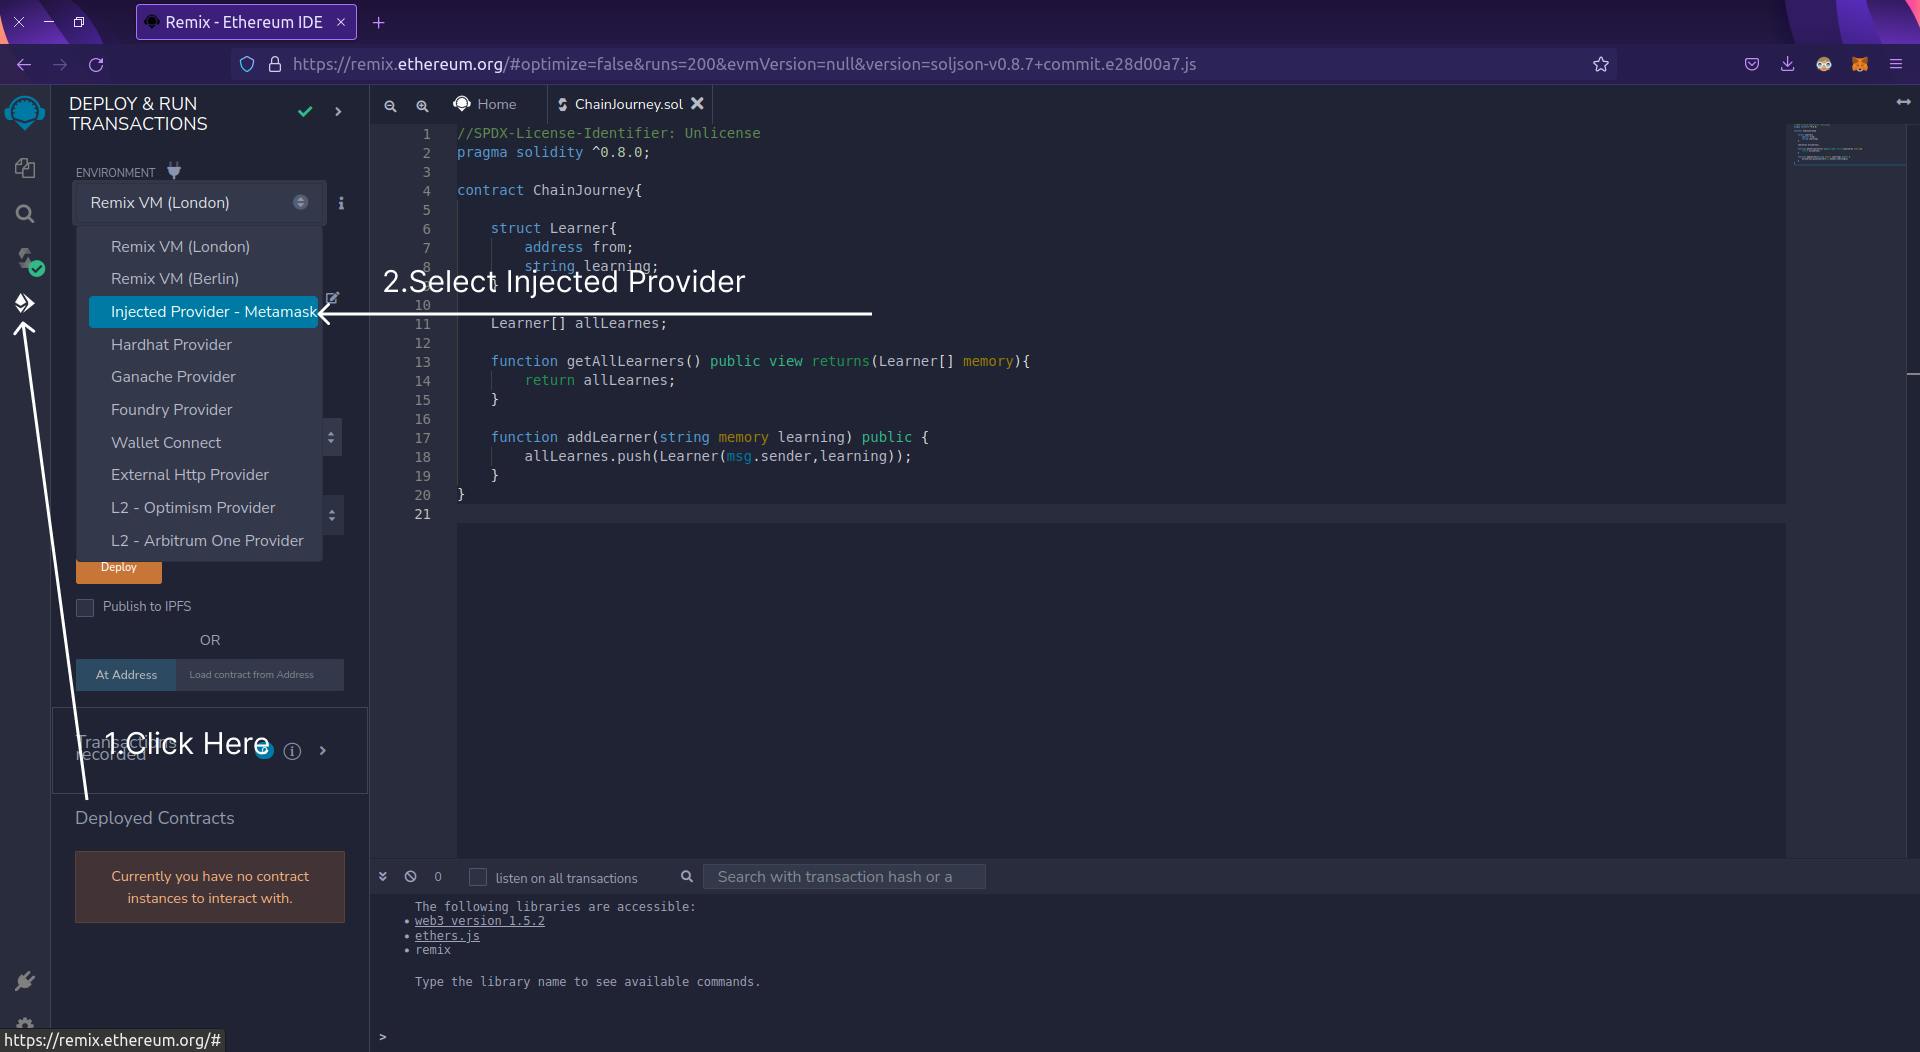
Now Click On Deploy Tab.
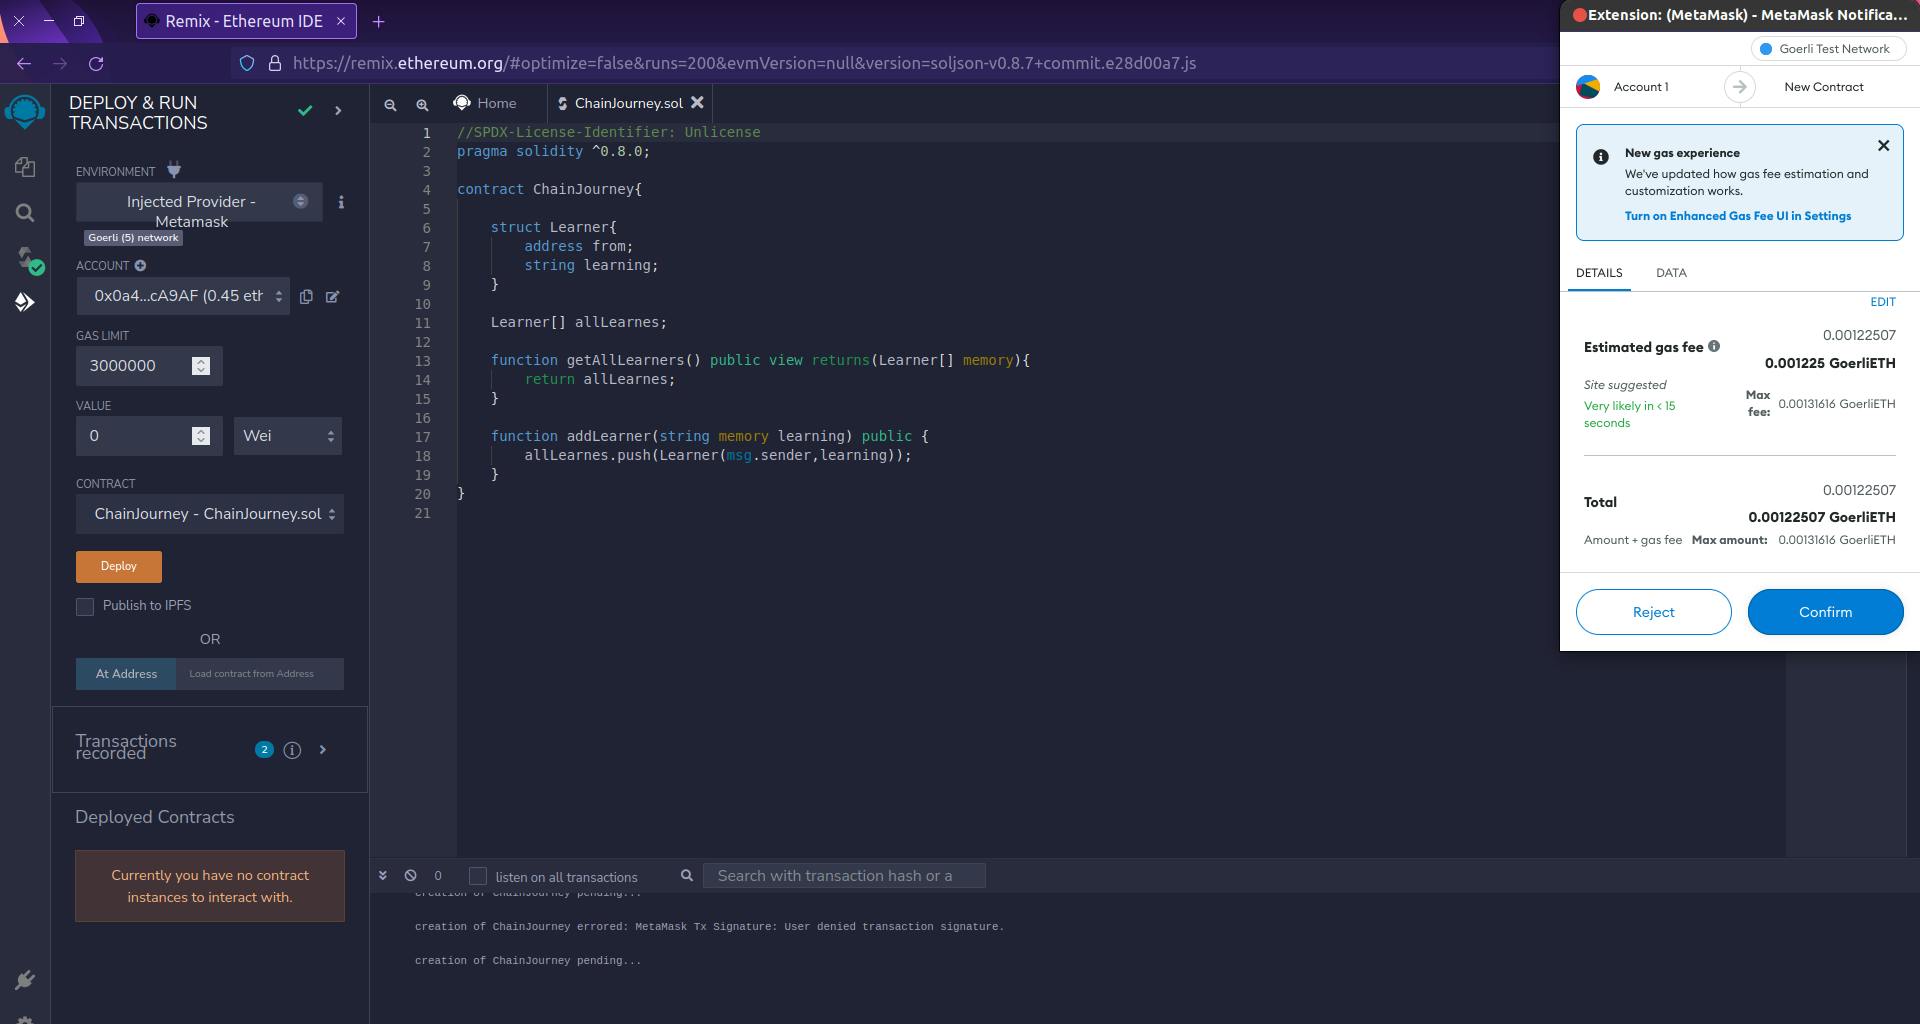
Now just Press the Deploy button and you will see a meta mask pop-up, just confirm the transaction and wait for a couple of seconds you see the contract address in Remix
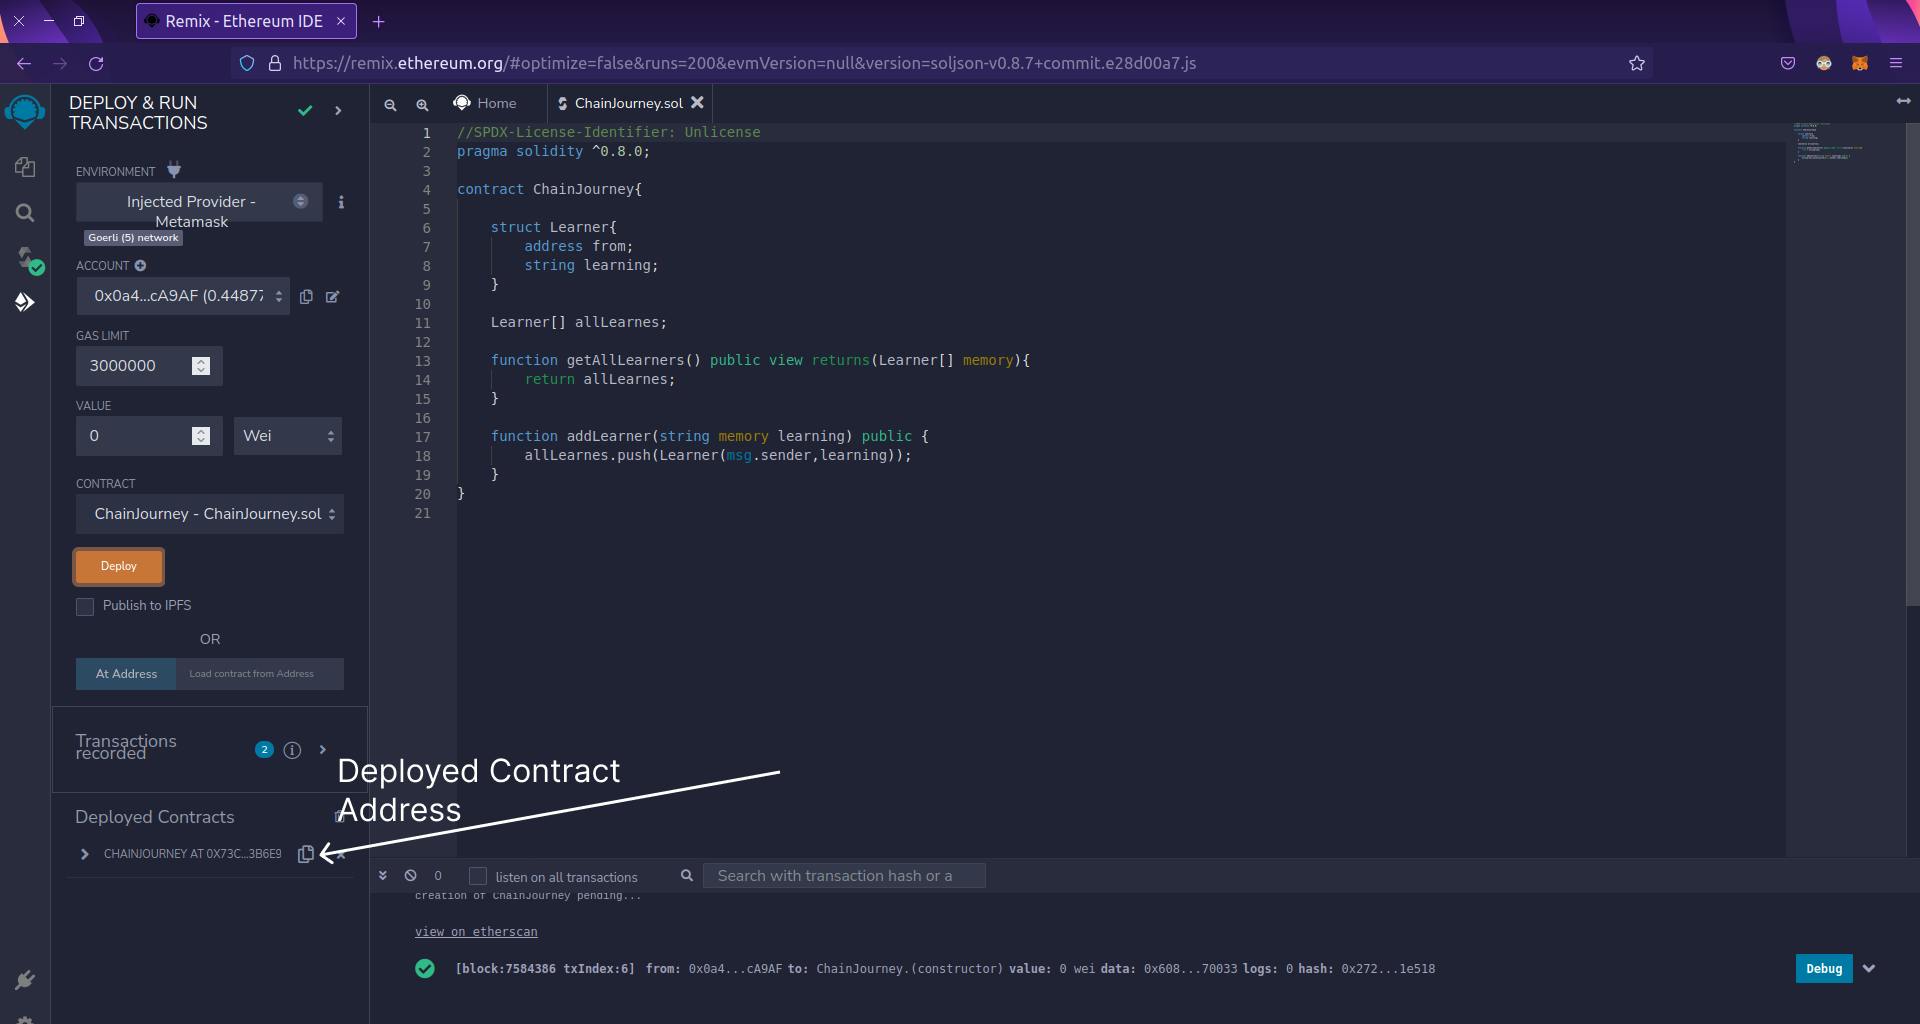
So, Take time, You just deployed your first smart contract.
Now just copy that address and keep it for future reference.
We also need Contract ABI, Switch to Compile tab, copy the ABI keep it for future reference.
Building Front-end
Now Open your index.html file and paste the below code.
<!DOCTYPE html>
<html lang="en">
 <head>
   <meta charset="UTF-8" />
   <meta http-equiv="X-UA-Compatible" content="IE=edge" />
   <meta name="viewport" content="width=device-width, initial-scale=1.0" />
   <title>Chain Journey</title>
   <link rel="STYLESHEET" href="./style.css" />
   <script
     src="https://cdn.ethers.io/lib/ethers-5.2.umd.min.js"
     type="application/javascript"
   ></script>
 </head>
 <body>
   <section class="form">
     <div id="caccount"></div>
     <label>Enter What you are learning</label>
     <input type="text" id="inputText" />
     <button onclick="addLearner()" id="addChain">Add to Chain</button>
     <div id="txnhash"></div>
   </section>
   <div class="container">
   </div>
   <script defer src="./interect.js"></script>
 </body>
</html>
In HTML We have only two sections
In the form section, we have one input field and one button and when the user will click on that button we are triggering a function addLearner().
And the div with container class is used to render all the data which is coming from the blockchain.
So let's add some CSS and style our page.
Open your style.css and paste the below code.
body {
 background: #c2e59c;
 background: -webkit-linear-gradient(to right, #64b3f4, #c2e59c);
 background: linear-gradient(to right, #64b3f4, #c2e59c);
 display: flex;
 flex-direction: row;
}
.form {
 flex: 0.5;
 background-color: rgba(0, 0, 0, 0.1);
 display: flex;
 flex-direction: column;
 justify-content: center;
 border-radius: 15px;
 padding: 15px;
}
#caccount {
 color: white;
 font-size: 1.3rem;
}
#inputText {
 background-color: rgba(0, 0, 0, 0.1);
 border: 2px solid transparent;
 padding: 15px;
 outline: none;
 border-radius: 10px;
 margin-block: 1rem;
 color: white;
 font-size: 1.2rem;
}
label {
 font-size: 1.3rem;
 color: aliceblue;
 font-weight: 600;
}
#inputText:focus {
 border: 2px solid aliceblue;
}
#addChain {
 width: max-content;
 align-self: center;
 padding: 8px;
 font-size: 1.2rem;
 background-color: violet;
 border: none;
 outline: none;
 border-radius: 8px;
}
.container {
 flex: 0.5;
 display: grid;
 place-content: center;
 row-gap: 5px;
 max-height: 90vh;
 overflow-y: auto;
}
.card {
 background-color: rgba(0, 0, 0, 0.1);
 padding: 10px;
 font-size: 1.2rem;
 font-weight: 600;
 border-radius: 10px;
 color: white;
}
@media (max-width: 688px) {
 body {
   flex-direction: column;
 }
}
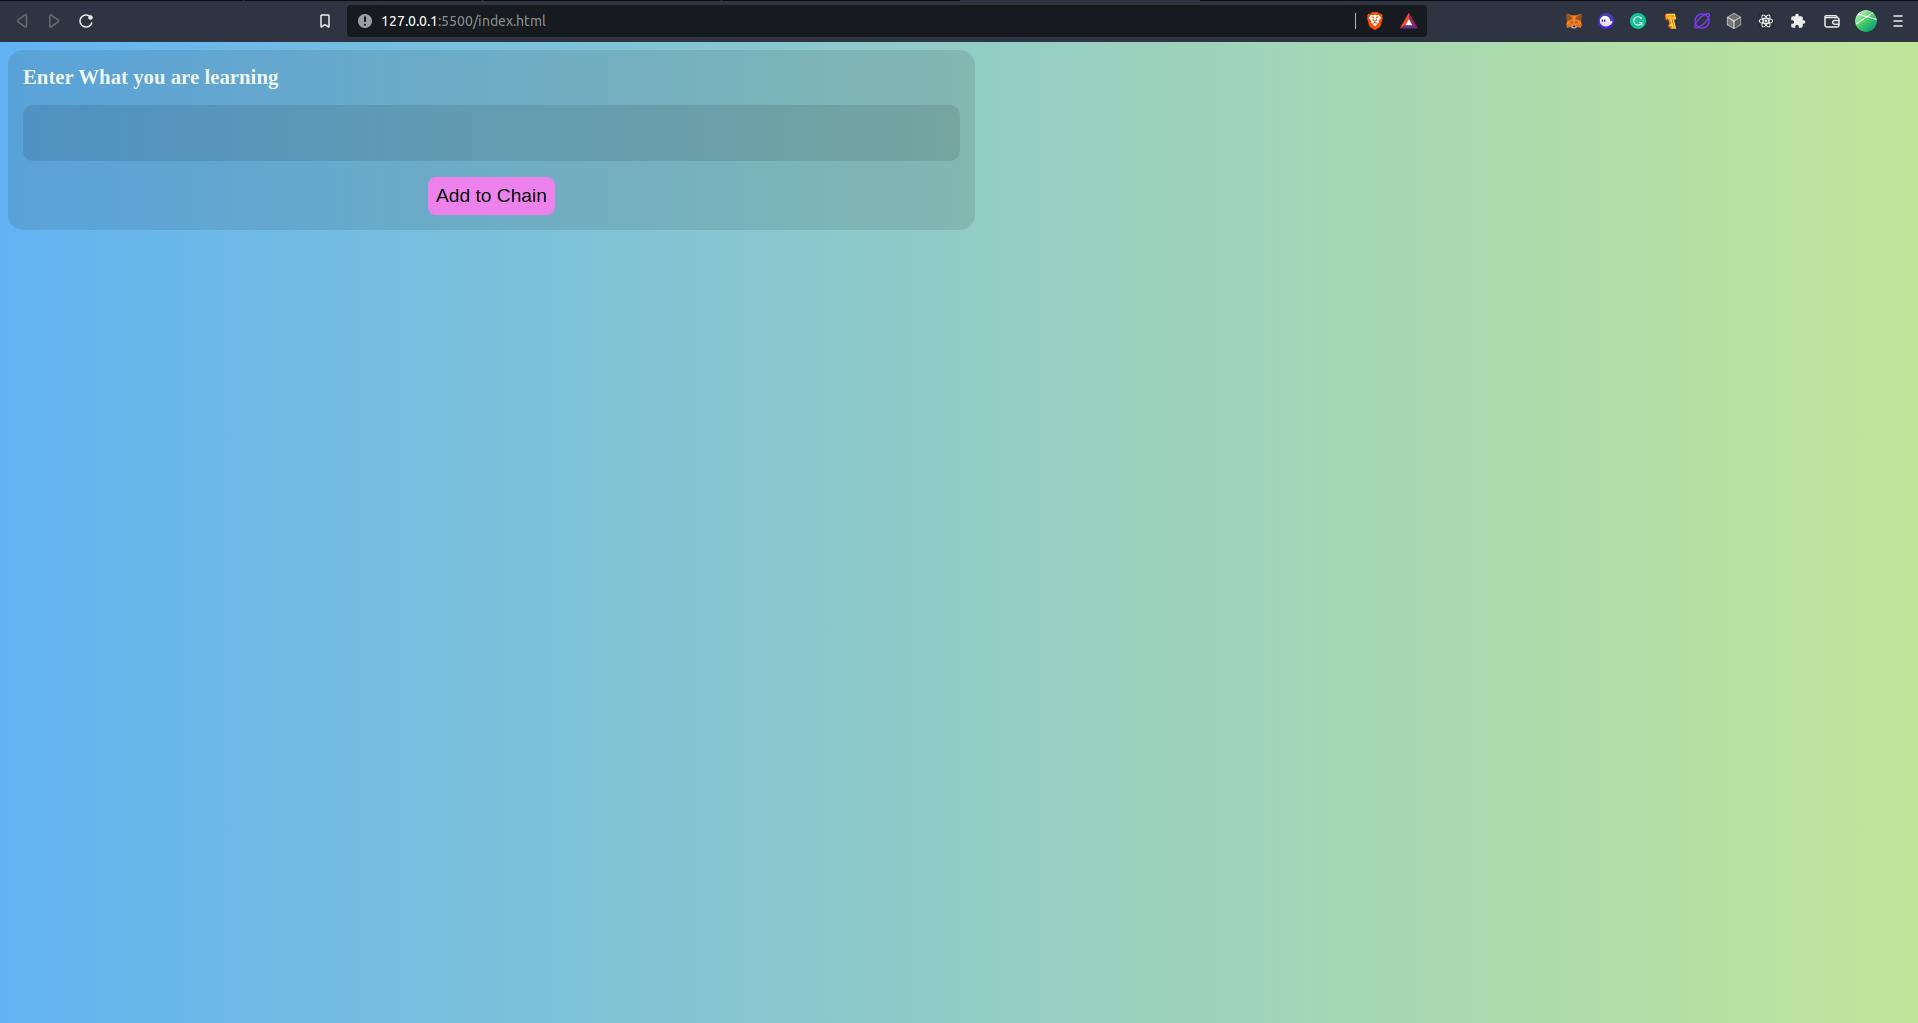
Now open your index.html with the browser or if you are using VS Code, install the extension Live Server and in your index.html file click right and select the option Open with live-server. It will open a local dev server at port 5500
Now go to Localhost
You should see the output like this.
Connecting Blockchain to Front-end
Now open your interect.js file.
Here we are going to write all the logic.
const CONTRACT_ADDRESS = "PASTE_YOUR_CONTRACT_ADDRESS_HERE";
const ABI = PASTE_YOUR_ABI_HERE
Now in the interect.js file, we are declaring two variables.
- CONTRACT_ADDRESS: This is our contract address, paste the address which you copied earlier in the tutorial.
Hint: The Address starts with
0x..and is 42 characters long string.
2.ABI= Paste the ABI that you grab earlier in the tutorial.
Hint: ABI Is an Array and starts like this ABI: [
Now declare two variables
const provider = new ethers.providers.Web3Provider(window.ethereum);
let account = "0x";
The provider is one utility that gives us access to all Ethereum Methods.
Here I am assuming that you have Metamask installed, if not, download it from the Chrome extension store and complete the onboarding.
Paste the below code in the interect.js file.
async function connectWallet() {
 let accountList = await provider.send("eth_requestAccounts", []);
 account = accountList[0];
 document.getElementById("caccount").innerHTML =
   "Current Account is :" + account;
 getlearners();
}

function getContract() {
 let signer = provider.getSigner(account);
 let contract = new ethers.Contract(CONTRACT_ADDRESS, ABI, signer);
 return contract;
}
Here we are defining two functions
1.connectWallet() : This function is used to connect the wallet(Metamask) with our Application.
Here we are seeing the request eth_requestAccounts to get the account and it will return an Array of addresses.
After that, we are just displaying the address to our front end.
As soon as the wallet is connected we are calling the function getlearners().
getContract(): This function creates the instance of our contract
Here we have new ethersContract: It takes three arguments:Contract Address, Contract ABI, and Signer.
and this returns the contract instance We can use this instance to call our contract methods.
Now in the interect.js file paste the below code.
async function getlearners() {
 let contract = getContract();
 let learners = await contract.getAllLearners();
 for (const item of learners) {
   appendCard(item);
 }
}
This function is used to retrieve all the data from the blockchain.
First, we are grabbing the contract instance by calling the getContract method and after that, we are calling contract.getAllLearners() method which will call our getAllLearners() function and it will return all learners from the chain
and we are storing them in learners variables.
After that we are are iterating over all the learners and call the function appendCard()
So lets define appendCard() function.
Hers's implementation of it:
function appendCard(item) {
 let container = document.getElementsByClassName("container")[0];
 let card = document.createElement("div");
 card.className = "card";
 card.innerHTML =
   "Address " + item.card + "<br/>" + "Learning : " + item.learning;
 container.append(card);
}
This function is just creating one div, then we are adding the classname card to it and by using card.innerHTML method we are actually writing the address of the learner and what the learner is learning.
After this, we are just appending this div to our container.
async function addLearner() {
 let learningtext = document.getElementById("inputText");
 if (learningtext.value === "") {
   learningtext.style.border = "2px solid red";
   learningtext.setAttribute("placeholder", "This filed can not be blank");
   return;
 }
 let contract = getContract();
 let txn = await contract.addLearner(learningtext.value);
 let showhash = document.getElementById("txnhash");
 let a = document.createElement("a");
 a.href = `https://goerli.etherscan.io/tx/${txn.hash}`;
 a.innerHTML = "Follow your transaction here";
 showhash.append(a);
 await txn.wait();
 history.go(0);
}
This is the function that adds the user's address and what he/she is learning to block-chain.
First, we are grabbing the value of the input.
If the user has not entered some input we will show him/her an alert and return from the function.
If the user has entered some text we will call our contracts addLearner() method.
After that, we are grabbing the div which will show the transaction hash to the user.
Here, we are creating an anchor element and setting the href value to https://goerli.etherscan.io/tx/${txn.hash}.
Here txn.hash is the transaction hash.
And after that, we are waiting for the transaction to confirm and
as soon as this resolves we are refreshing the page, so the data is updated.
In the interact.js add this line
window.addEventListener("load", connectWallet);
here we are adding the event listener to the window and when this event occurs, we are calling the function connectWallet.
Here's the full code of interect.js.
 const CONTRACT_ADDRESS = "PASTE_YOUR_CONTRACT_ADDRESS_HERE";
const ABI = [
 {
   inputs: [
     {
       internalType: "string",
       name: "learning",
       type: "string",
     },
   ],
   name: "addLearner",
   outputs: [],
   stateMutability: "nonpayable",
   type: "function",
 },
 {
   inputs: [],
   name: "getAllLearners",
   outputs: [
     {
       components: [
         {
           internalType: "address",
           name: "card",
           type: "address",
         },
         {
           internalType: "string",
           name: "learning",
           type: "string",
         },
       ],
       internalType: "struct ChainJourney.Learner[]",
       name: "",
       type: "tuple[]",
     },
   ],
   stateMutability: "view",
   type: "function",
 },
];

const provider = new ethers.providers.Web3Provider(window.ethereum);
let account = "0x";

async function connectWallet() {
 let accountList = await provider.send("eth_requestAccounts", []);
 account = accountList[0];
 document.getElementById("caccount").innerHTML =
   "Current Account is :" + account;
 getlearners();
}

function getContract() {
 let signer = provider.getSigner(account);
 let contract = new ethers.Contract(CONTRACT_ADDRESS, ABI, signer);
 return contract;
}

async function getlearners() {
 let contract = getContract();
 let learners = await contract.getAllLearners();
 // console.log(learners);
 for (const item of learners) {
   appendCard(item);
 }
}

function appendCard(item) {
 let container = document.getElementsByClassName("container")[0];
 let card = document.createElement("div");
 card.className = "card";
 card.innerHTML =
   "Address " + item.card + "<br/>" + "Learning : " + item.learning;
 container.append(card);
}

async function addLearner() {
 let learningtext = document.getElementById("inputText");
 if (learningtext.value === "") {
   learningtext.style.border = "2px solid red";
   learningtext.setAttribute("placeholder", "This filed can not be blank");
   return;
 }
 let contract = getContract();
 let txn = await contract.addLearner(learningtext.value);
 let showhash = document.getElementById("txnhash");
 let a = document.createElement("a");
 a.href = `https://goerli.etherscan.io/tx/${txn.hash}`;
 a.innerHTML = "Follow your transaction here";
 showhash.append(a);
 await txn.wait();
 history.go(0);
}

window.addEventListener("load", connectWallet);
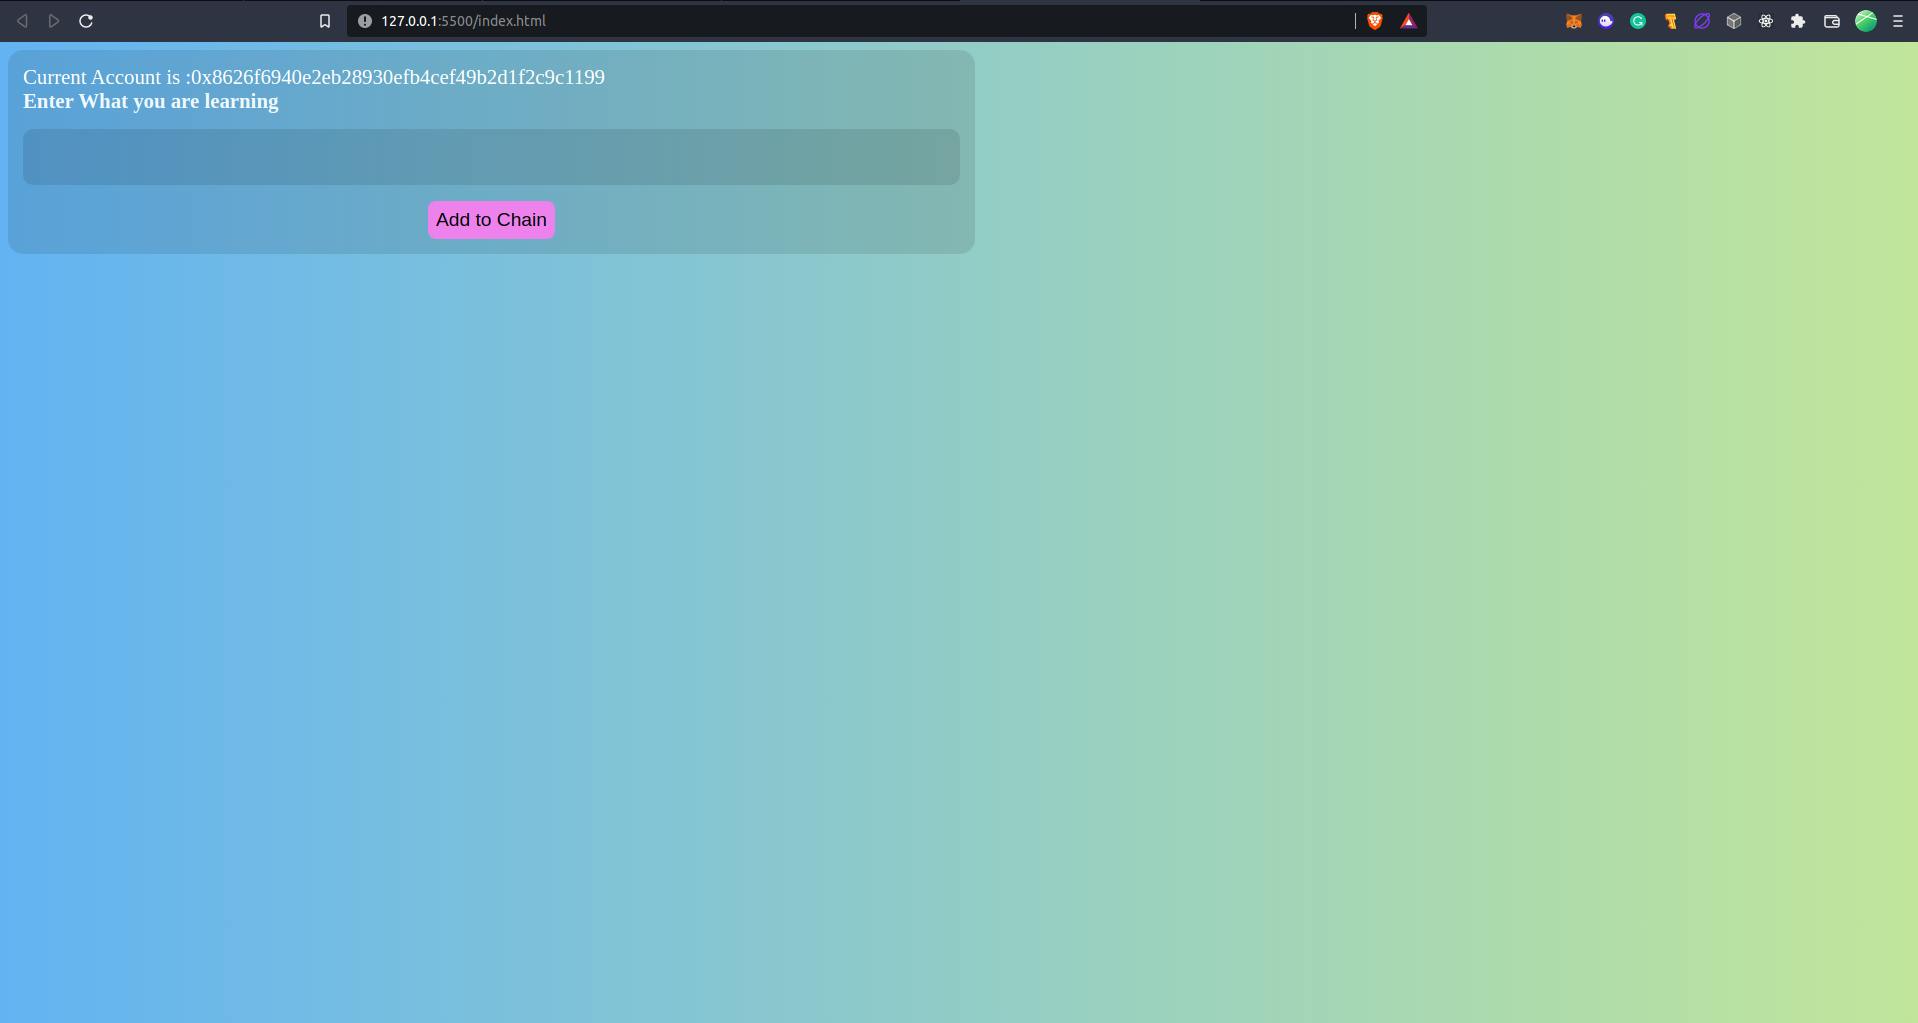
Now open your localhost and you should see the output look like this.
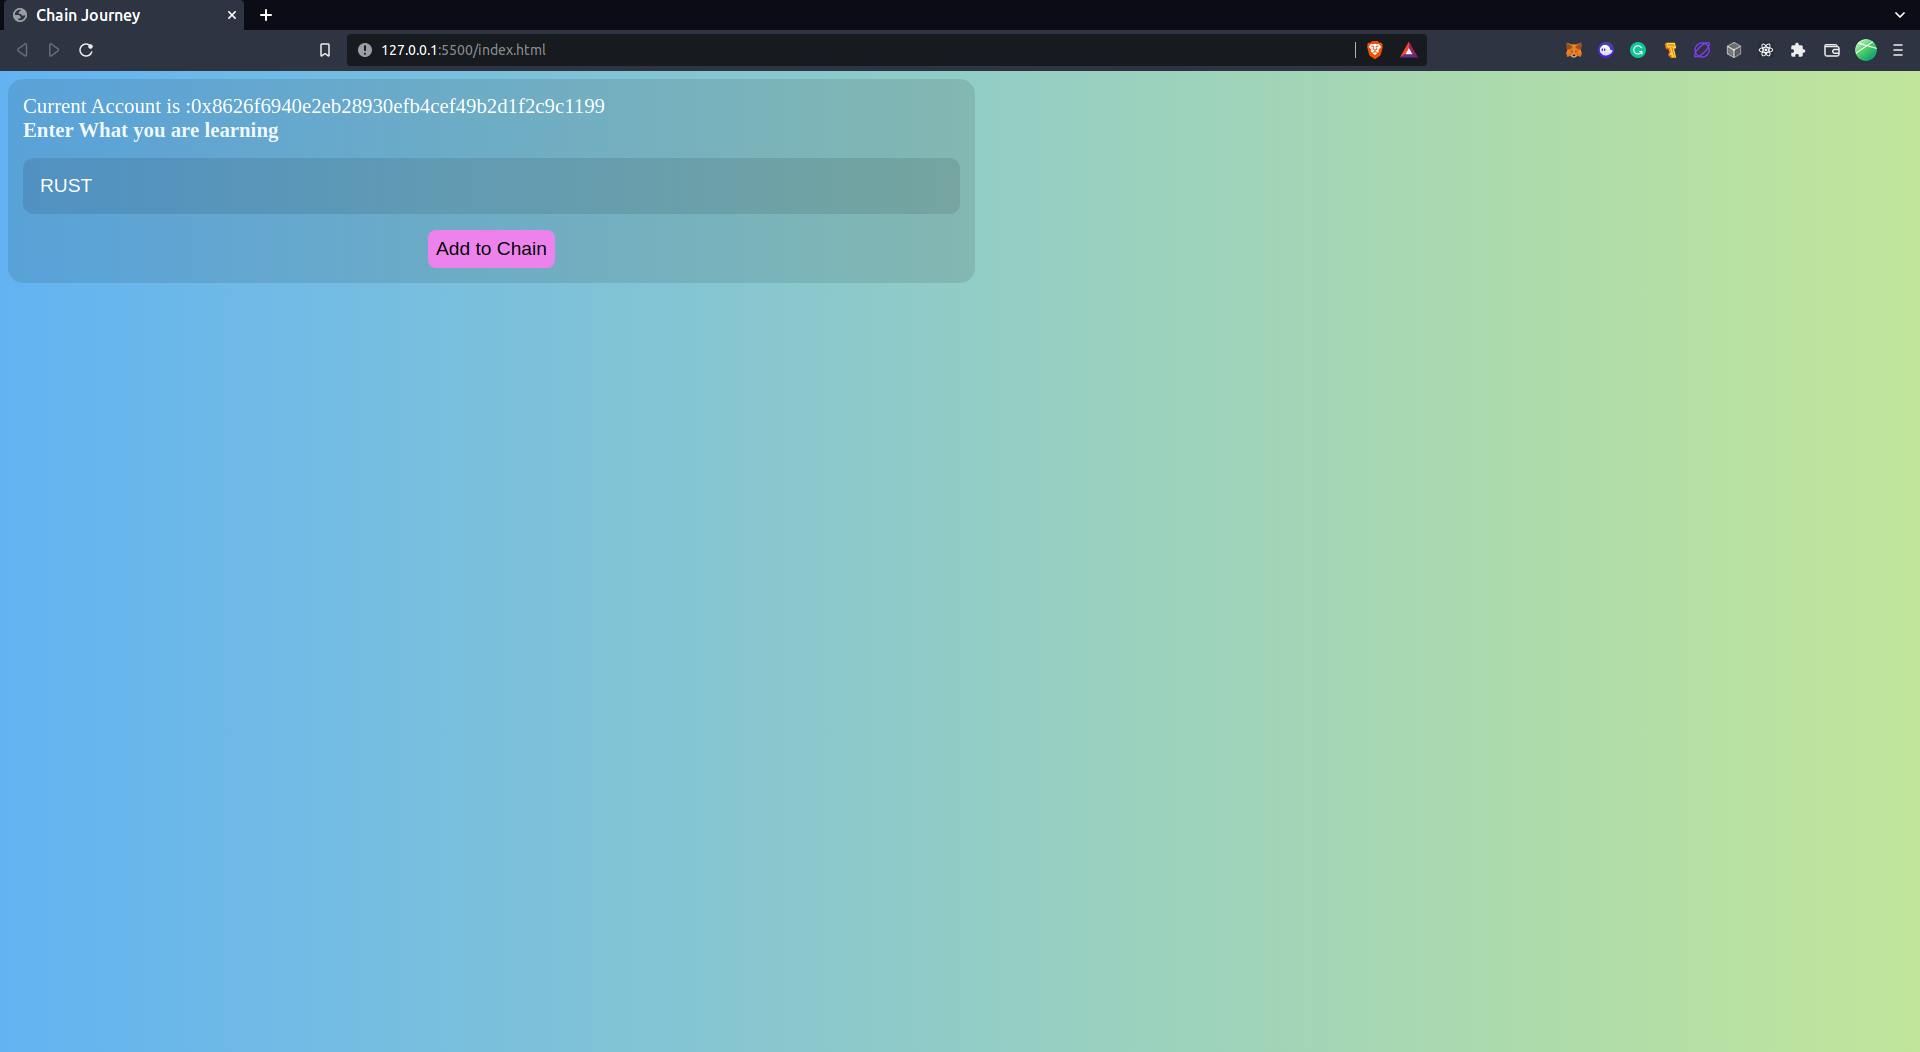
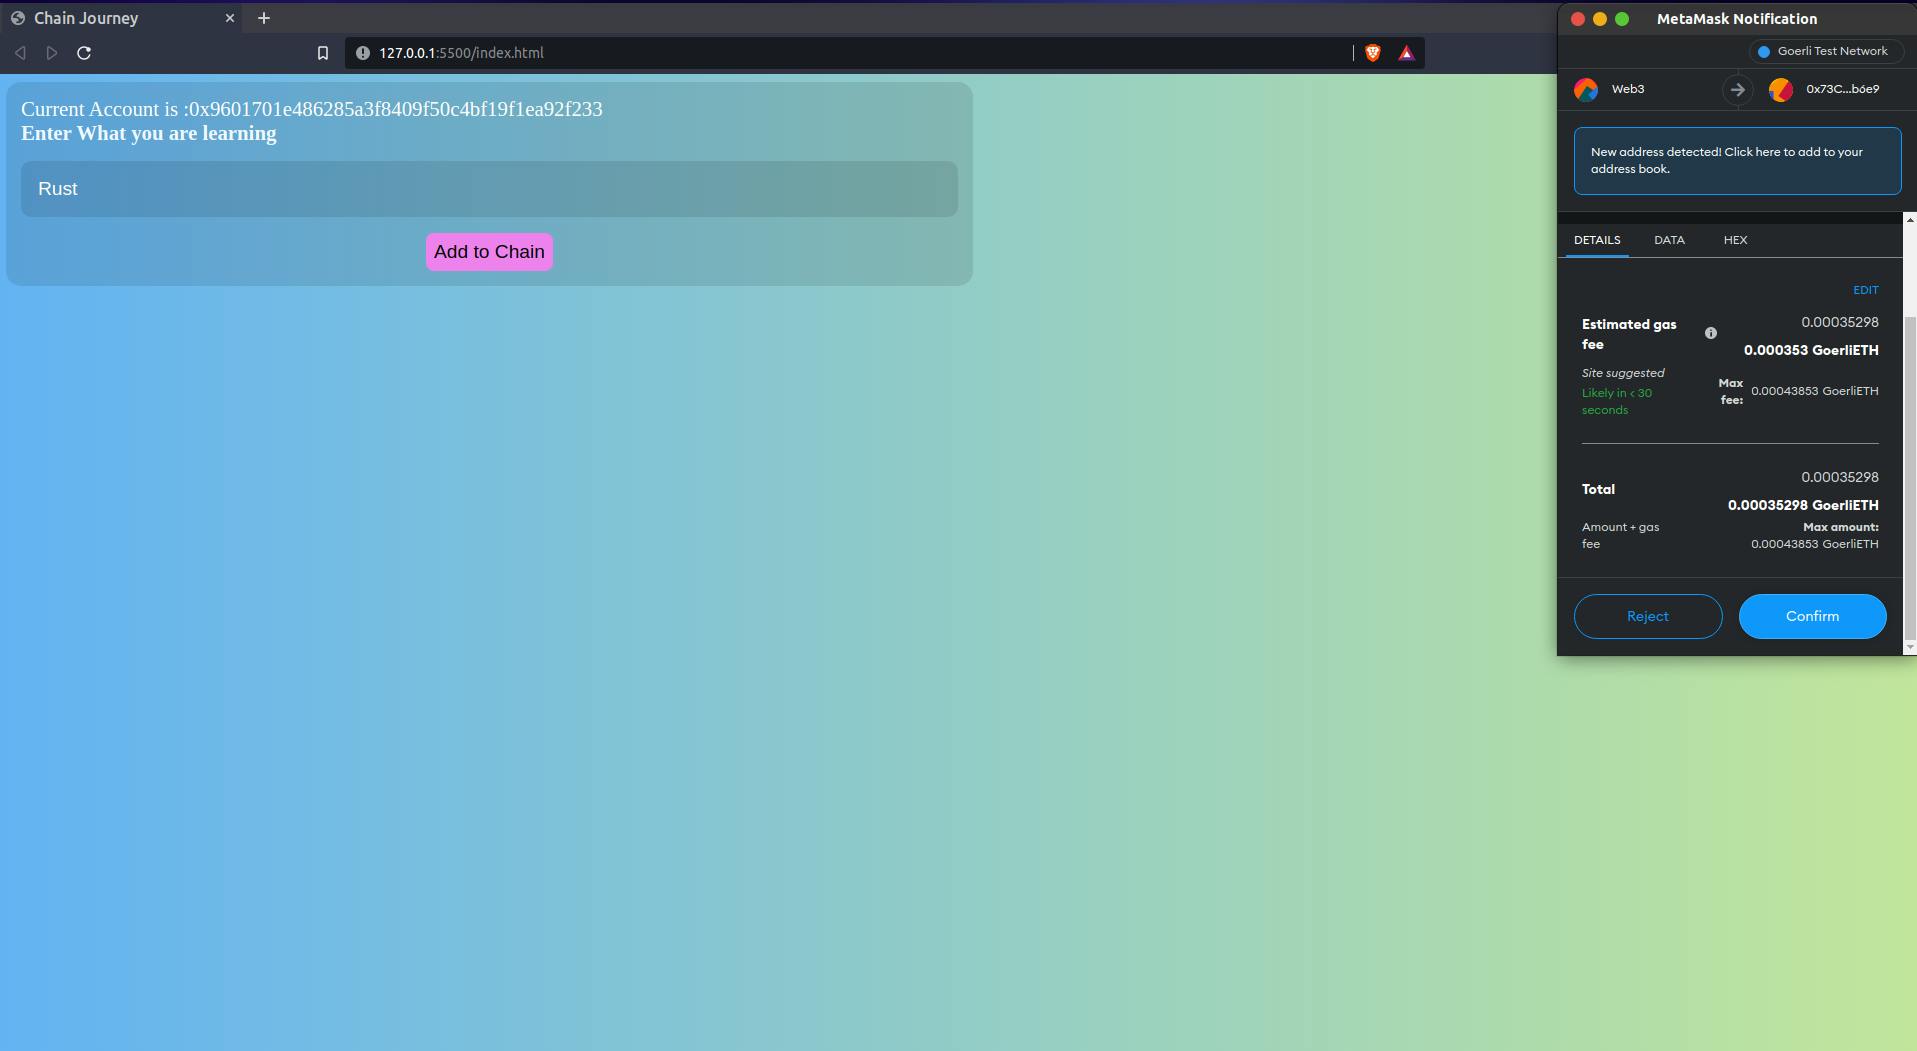
Now type what are you learning in the input field and press the add to chain button.
A metamask pop-up will appear, confirm the transaction and wait for some time.
After roughly 10-15 seconds the page is refreshed and you will be able to see what you have typed in the text is now stored on the block-chain and it is retrieved and rendered on the front-end.
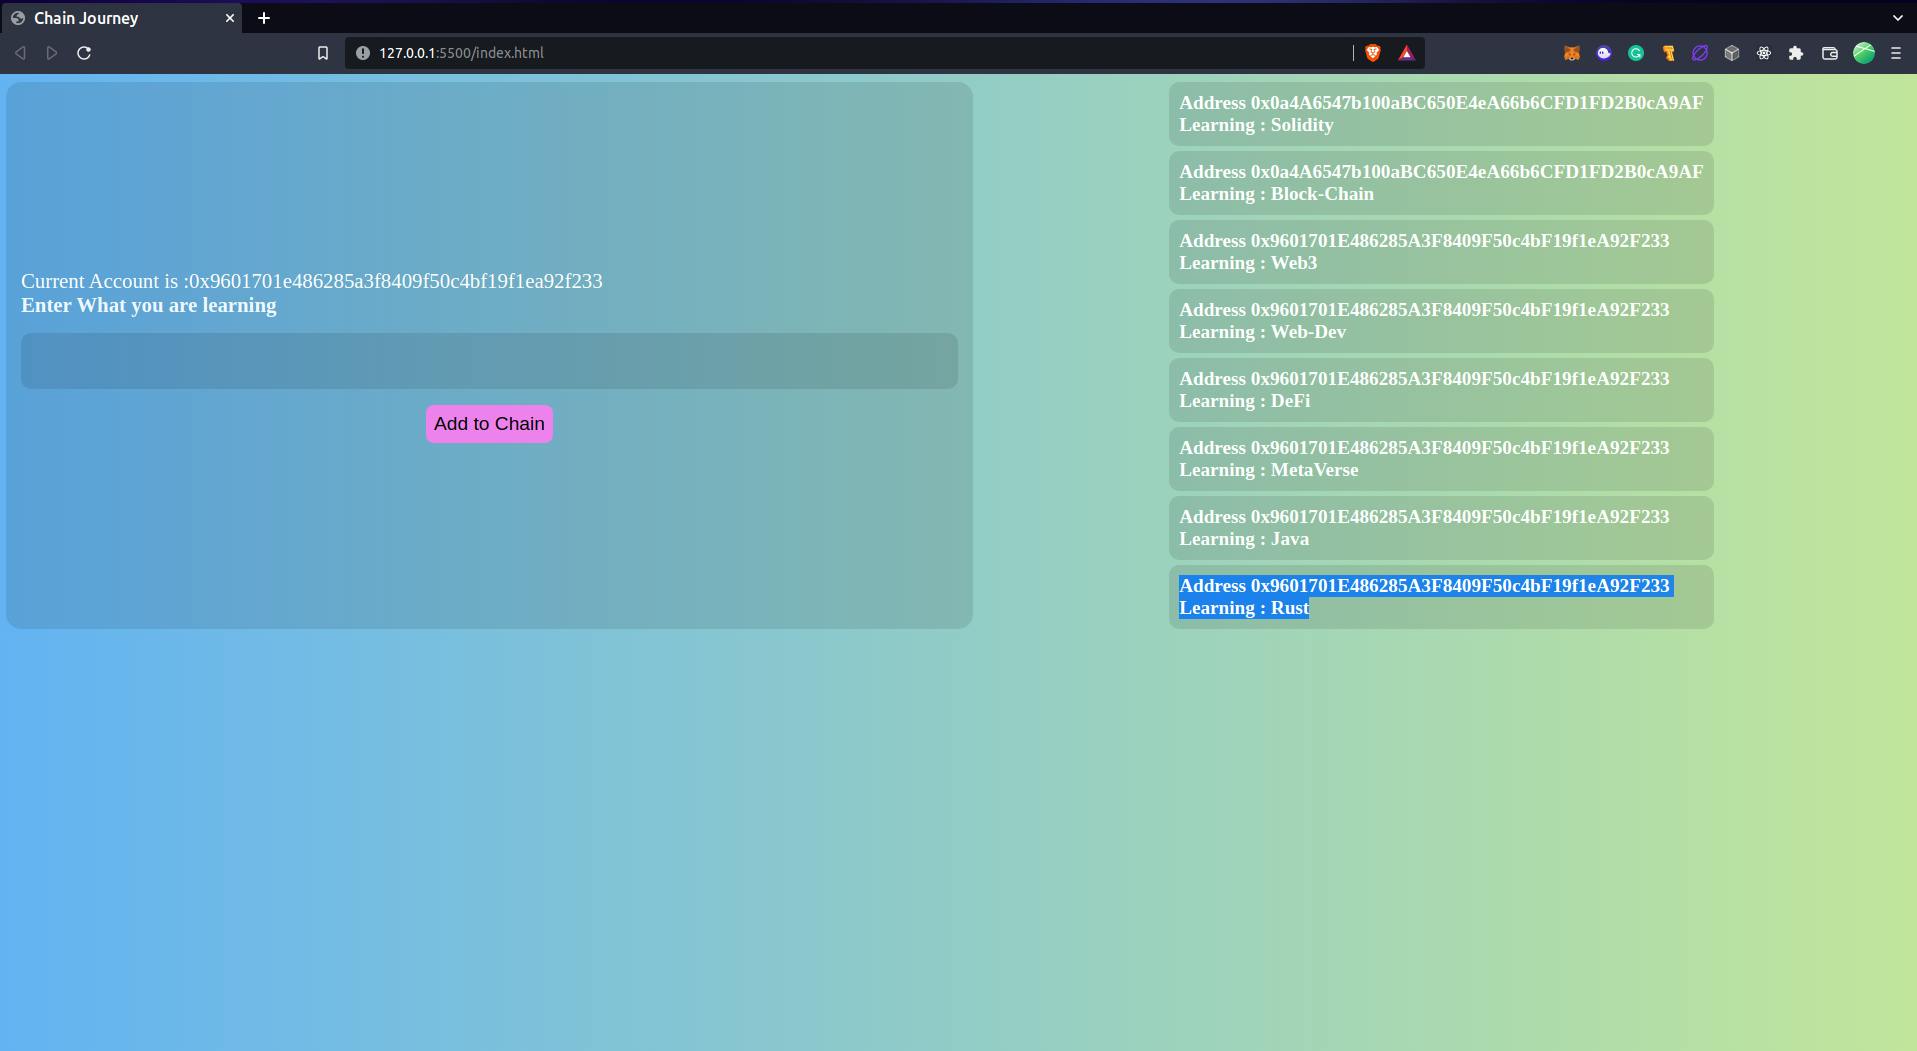
So if you have followed until here, just reward yourself.
And a big congratulations on building your first DApp.
Until next
Keep Coding, Keep Debugging.
Feel free to contact me.
Vivek Suthar
![]()
![]()
![]() ````
````