
Exploring React Native's New Architecture: A Peek into the New Architecture
A comprehensive overview of the significant changes in React Native's architecture


Introduction
React Native is an open-source, cross-platform application development framework developed by Meta (previously Facebook) that enables developers to build iOS, Android, and Web applications from a single codebase.
React Native allows developers to write their apps in ReactJS, a JavaScript framework, following the philosophy of "Learn once, write anywhere." This means that developers can learn one technology, React, and use that same knowledge to build apps for iOS, Android, and the web.
Developers write their code using React, and React Native handles rendering the UI and running the code for each platform.
This approach has several benefits:
•Reduced development time since developers only write core app logic once.
•Easier maintenance as the changes are made in one codebase.
•Reusable UI components across platforms.
However, React Native still requires some platform-specific code for features. The framework handles rendering UI and events, but developers must write code for:
Accessing device sensors
Accessing Platform-specific Code
Utilizing Native APIs
Current Architecture of React-Native
Before jumping to the new architecture, let's understand the current architecture of react-native, and how it renders the UI, handles the task, and how it executes our code.
In the Current architecture, React native is having two threads, JS and UI thread
Let's understand this threads
JS Thread :
This is the JavaScript thread that executes all the JavaScript code of our application. It includes:
Executing JavaScript code for components
Running event handlers
Calling Native Modules to interface with native APIs
Scheduling UI updates
The JS thread is responsible for managing the state of the React Native app and determining when and how to update the UI. When a UI update is needed, the JS thread schedules a command to be executed on the UI thread.
The JS thread runs the JavaScript virtual machine and executes the app's JavaScript code. It's considered the "main thread" of the app.
Here, the JavaScript VM provides an environment for JavaScript code to run that is isolated from the underlying operating system. React native supports the JSC(JavaSciptCore), and the Hermes Engine(RNs in-house engine).
UI Thread:
This is the native thread that manages all native UI operations. This includes:
Rendering UI views and components
Handling touch events and gestures
Animating UI elements
Calling native APIs to access device features
The UI thread is managed by the native platform (iOS or Android) and executes native platform code.
When the JS thread schedules a UI update, the UI thread executes the necessary native code to render the new UI. It then notifies the JS thread that the update is complete.
Additionally, There is one Shadow Thread, which is responsible for calculating the layout of our elements.
React Native uses Yoga for the Layout calculation.
During the initial render or when we trigger re-render by setting a state or updating the props, it calculates the sizing of the elements and all other properties.
By doing this layout calculation in a separate thread, it does not block the main UI thread allowing for a smooth and responsive user interface.
Once the Yoga layout is calculated, React Native applies the resulting positions and sizes to the native views on the main UI thread, ensuring that the components are displayed correctly on the screen.
OK, So now we are clear on how the JS and UI threads inter-operate to run our app,
But, Do you know how the data is being passed from one thread to another thread and Vice versa?
Here comes the Bridge. The Bridge is the component that passes the data between the JS and UI threads. But this comes at a cost. How? Let's understand it
So When passing the data from one layer to another layer, it must be serialized and sent over the bridge, and the other layer deserializes it and then process it, and the format chosen was JSON for serializing and deserializing. This leads to Frame drops and stutters in our app.
The React Native Bridge is
Asynchronous
Imposes an extra overload
Single-threaded
Here's the Visualization of it how it works.
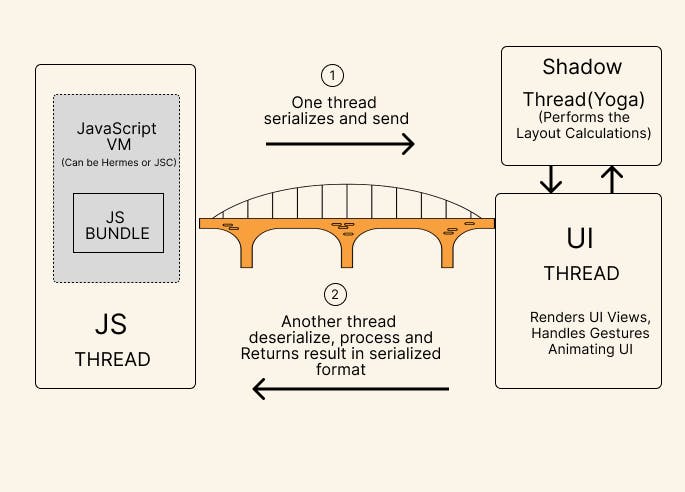
(I am not good at drawing 😅🙂, I tried my best to explain in picture form how the things work)
Native Modules System
By default, React Native provides many APIs and Components, but sometimes we need to access the platform-specific APIs or some native APIs like On-device ML, File Storage, Wi-Fi, or Bluetooth.
For this purpose, React Native provides a way to do this in the form of Native Modules. You can learn more about them Here
A custom module is a piece of native platform code (either Objective-C/Swift for iOS or Java/Kotlin for Android) that can be accessed from the JavaScript thread.
To create a custom module, we first implement the native code in the iOS or Android project. This native code contains the logic to call the relevant native platform APIs(Like Camera, Clipboard, Sensors, etc...).
Then, We expose functions from that native code to the JavaScript thread. This is done by registering the native functions with the React Native bridge.
Once a custom module is created, it can be imported and used from JavaScript just like any other module. You can call the exposed functions and pass data back and forth between the native and JavaScript threads.
In the current architecture, the apps initialize all the Native Modules used by JavaScript (e.g., File Storage, Camera module) before it opens. This means that even if some modules are not immediately required by the user, they still have to be set up during start-up. As a result, the app's launch might be slower due to this unnecessary initialization.
So, At this point you should be clear with the current architecture of React Native, how it works, and what are the issues with the current architecture.
So Let's discuss the New Architecture.
New Architecture
Due to the numerous issues encountered in the past, the React Native team has decided to migrate to a completely new architecture. With the release of React Native v0.68, this new architecture is being introduced. However, it is important to note that this new architecture is not enabled by default at this stage, as the team acknowledges that it is still in its early stages and there might be some potential breaking changes.
A Key OverView of The New Architecture:
JSI(JavaScript Interface)
The New Native Renderer-Fabric
The New Native Modules System: Turbo Modules
Codegen: which generates boilerplate C++ required by the New Architecture via static typing in JavaScript
Now Let's Understand each in a detailed manner
JSI-JavaScript Interface
JavaScript Interface (JSI) is a powerful technology introduced by the React Native team to improve the performance and interoperability of JavaScript with native code. It aims to bridge the gap between JavaScript and native platforms by providing a more efficient and seamless way to communicate and interact with native code.
As discussed above, when there is a need of calling the native API, it must be done through the React Native Bridge, which needs the data in serialized form and is asynchronous. This means that the Native Part and the JS part are totally unaware of each other meaning that The JS thread cannot call the native method directly and vice versa.
Here comes the JSI(JavaScript Interface)
In the New Architecture, the old Bridge is being replaced with the new JavaScript Interface.
Accordingly to the React Native docs, JSI is A lightweight API to embed a JavaScript engine in a C++ application.
JSI is a lightweight, general-purpose layer written in C++, enabling direct method calling between the JavaScript engine and the native environment. By leveraging JSI, the JavaScript engine can directly call native methods, eliminating the need for the traditional bridge and streamlining communication between JavaScript and native code.
But wait, What is the general purpose?, the current React-native bridge can not work with all the JavaScript engines. The JSI will be not associated with the JavaScript VM, meaning that any JS engine can be used with the new architecture like V8, Hermes, Chakra, etc.
Let's Understand How the JSI is able to call the native methods directly?
In the JSI, The Native Methods/Functions are exposed to JS via the C++ Host Objects.JavaScript holds a reference to these objects and can directly invoke the native methods using those references.
C++ Host Objects refer to native objects that are exposed to JavaScript through JSI. These objects are implemented in C++ and can be directly accessed and manipulated by JavaScript code, bridging the gap between the JavaScript runtime and the native environment.
Here's some code reference to the C++ Host Objects of some libraries which supports the new architecture. (Don't worry if you don't understand, give it a shot, you might get the things)
react-native-vision-camera : https://github.com/mrousavy/react-native-vision-camera/blob/v3/android/src/main/cpp/FrameHostObject.h 2)react-native-mmkv : https://github.com/mrousavy/react-native-mmkv/blob/master/android/src/main/cpp/MmkvHostObject.cpp 3) react-native-skia : https://github.com/Shopify/react-native-skia/blob/main/package/cpp/jsi/JsiHostObject.cppYou might understand better by seeing this image

So It was all about JavaScript Interface, If you are interested to look the JSI's source code, You can find it HERE
Now Let's move to our next topic. :)
The New Native Renderer: Fabric
Before diving into Fabric, Let's understand how current UI managers work and how it renders the UI.
The JavaScript thread is responsible for maintaining the virtual DOM, diffing the changes, and updating the UI accordingly.
As discussed above, To interact with the native platform's functionalities (e.g., UI components, sensors, permissions, etc.), React Native uses native modules and passes the data through React Native Bridge,
UI rendering from component to native views:
Component rendering: When we write a React Native component(like
View,Text,Image, etc.), which are platform-agnostic(Not all). These components are mapped to their corresponding native counterparts in the rendering process.Virtual DOM and Diffing: React Native maintains a virtual representation of the UI components called the Virtual DOM. When we update the state or props of a component, React Native performs a process known as "reconciliation" or "diffing." It calculates the difference between the previous Virtual DOM and the latest updated Virtual DOM to determine the minimum set of changes needed to update the actual UI.
Updating Native Views: After the diffing process is complete, React Native constructs a "batch" of UI updates. It then sends this batch of updates to the native platform via the Bridge.
Native Views Rendering: Then the native side, the native modules receive the batch of UI updates from the Bridge. They interpret these updates and apply the necessary changes to the native views, ensuring that the UI stays in sync with the React Native component tree.
UI Rendering on the Screen: Once the native views are updated, the native UI components take over, and the updated UI is rendered on the device screen, just like any other native app. It renders the native UI based on the Host Platform, ex
Renders TextView on Android
Renders UITextView on iOS
Renders div on the Web
Now, Here note that The Native part also maintains the ShadowNodeTree for the layout calculation.
The Shadow Node tree is a representation of the UI components in native code that mirrors the component tree on the JavaScript side (Virtual DOM). Each React component has a corresponding Shadow Node in native code, which holds information about the layout and style of the component.
When the JS thread sends updates to the native side through the Bridge, it includes information about the changes in the component tree. The native modules use this information to update the Shadow Node tree, reflecting the changes in the UI layout and style.
The layout calculation is an essential part of rendering UI components, as it determines the position and size of each component on the screen.
The Shadow Node tree helps in efficiently calculating the layout on the native side without the need for excessive communication with the JavaScript thread. This is particularly important because layout calculations can be expensive, and having the Shadow Node tree allows React Native to optimize the rendering process and improve performance.
So, What is the problem with this approach?
The communication between threads in React Native occurs through a bridge, which can introduce some performance overhead due to slow transfer rates and data copying.
Slow Transfer Rates: The bridge introduces latency because data needs to be serialized on one side (JavaScript) and deserialized on the other side (native). This process can be slow, especially for large or complex data structures.
Data Copying: When data is sent across the bridge, it involves copying the data from one side to another. This copying can consume extra CPU resources and memory, further impacting performance. (As both threads are unaware of each other's world)
Since the JavaScript thread and UI threads are not in sync, there are certain use cases when our app can seem laggy as it drops frames. (Example: Running complex animations on the UI thread, Frequent and rapid updates to the UI can cause frame drops)
Ok, Now at this point you should be clear about how the UI is rendered with the current UI Manager, It is time we move to New Renderer Fabric
Fabric, which is mainly written in C++, will replace the current UI Manager.
Accordingly to the official react-native docs,
Fabric is React Native's new rendering system, a conceptual evolution of the legacy render system.
In the JSI section of this article, we discussed that the JavaScript Interface (JSI) allows direct invocation of native methods to JavaScript, including UI methods. As a result, the JavaScript and UI threads can be in sync, leading to improved performance for tasks like rendering lists, handling navigation, and managing gestures and touch events, complex animations. This synchronization enhances overall app responsiveness and user experience.
Note that the Fabric is in the active roll-out.
Let's See the advantages of Fabric :
Improved Performance: Fabric introduces a more efficient rendering engine and asynchronous rendering capabilities. This leads to smoother animations, reduced frame drops, and overall better app performance.
The improved interoperability between host views and React views allows the renderer to measure and render React surfaces in sync. This means that layout calculations and rendering happen together, avoiding the "jump" issue that occurred in the old architecture when embedding a React Native view inside a host view. With this improvement, the UI looks smoother and more seamless.
Better Host Platform Interoperability: here's better compatibility when embedding React Native components into host platforms. The layout calculations now happen smoothly and without any issues, making it easier to integrate React Native with host platform frameworks that require synchronous APIs. This improvement ensures a seamless and user-friendly experience when combining React Native with other native components.
Shared C++ core: the renderer is written in C++ and shared across different platforms. This means that the core codebase is the same for Android and iOS, making it easier to maintain consistency and allowing React Native to be adopted on new platforms more easily.
Faster App Start Time: Host components are initialized lazily by default. This means that they are only loaded and set up when they are actually needed, leading to a faster app startup time. It helps in improving the overall user experience and reduces the initial loading time of the app.
Now Let's see how the Fabric works:
Fabric goes through a sequence of steps to render our react native view into the host views, the series of these steps is called the render pipeline.
This render pipeline consists of 3 phases :
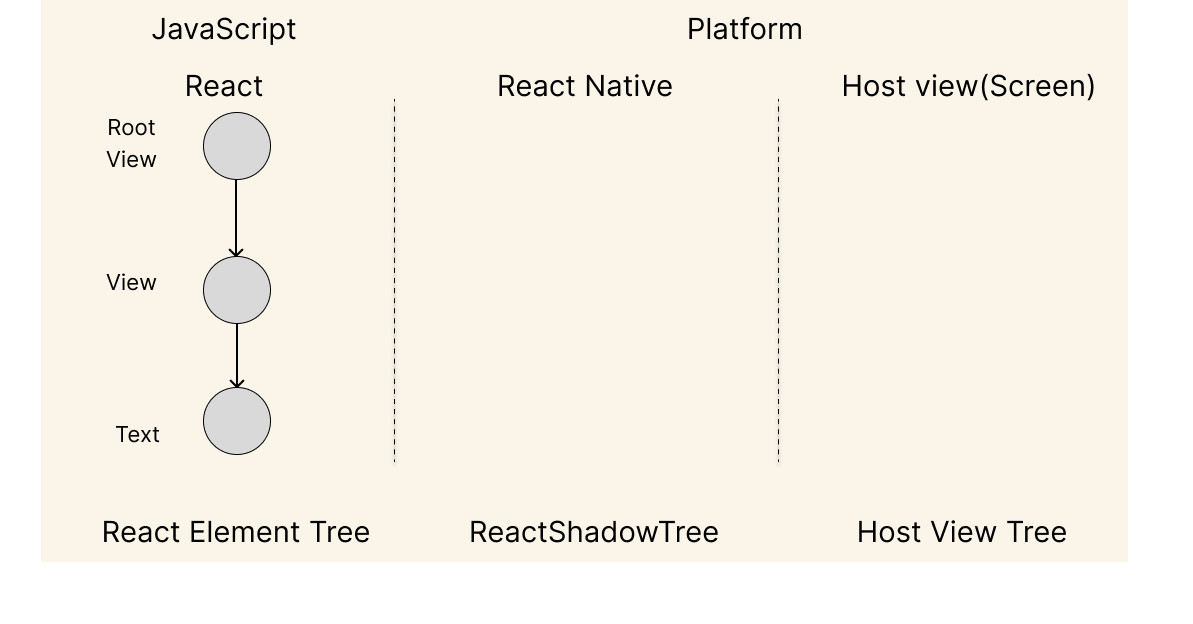
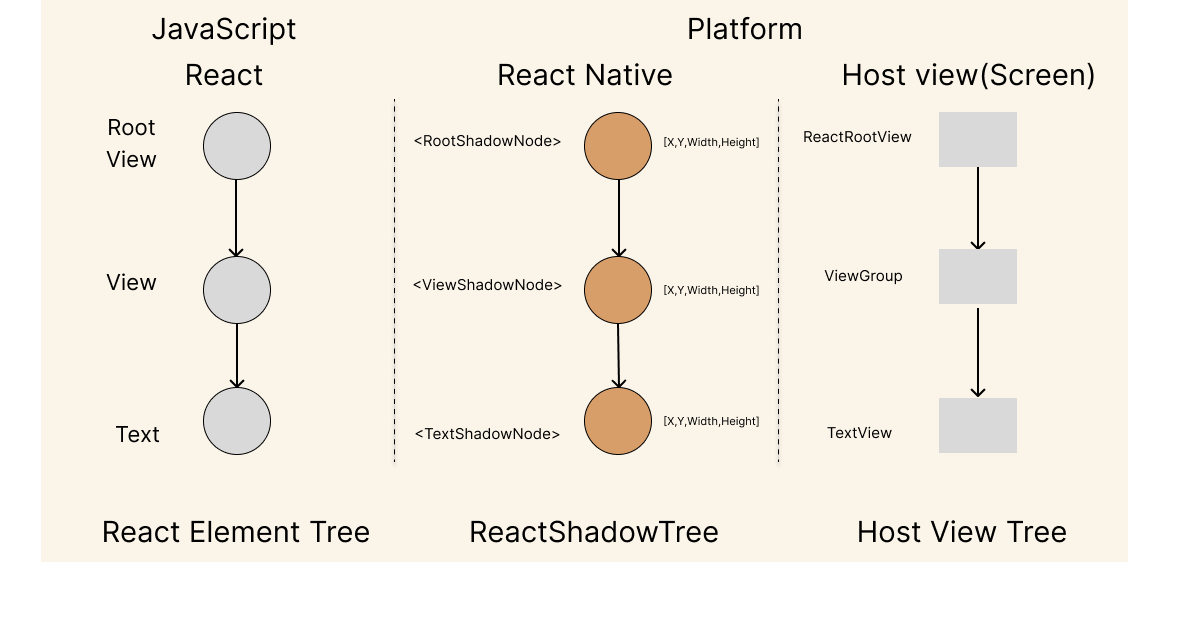
Render: When React runs your app, it handles the logic and creates a React Element Tree in JavaScript. This tree represents your app's components and structure. Then, the renderer takes this tree and creates a React Shadow Tree in C++
Commit: Once the React Shadow Tree is fully created, the renderer triggers a commit. This makes both the React Element Tree and the new React Shadow Tree the "next tree" to be mounted. Additionally, it schedules the calculation of layout information to ensure that the UI components are displayed correctly on the screen.
Mount: Now We have the Final React Shadow Tree and the results of Layout Calculation, now it is converted into the Host View Tree
Looks a little Complex, Let's understand with the example how this is done.
Now we want to render the following component
function MyText(){
return (
     <View>
        <Text>My Custom Text Component</Text>
     </View>
    );
}
Above, We have one <MyText /> component is a simple react element, which returns a View that contains a text with some text.
Let's see each phase of the render pipeline.
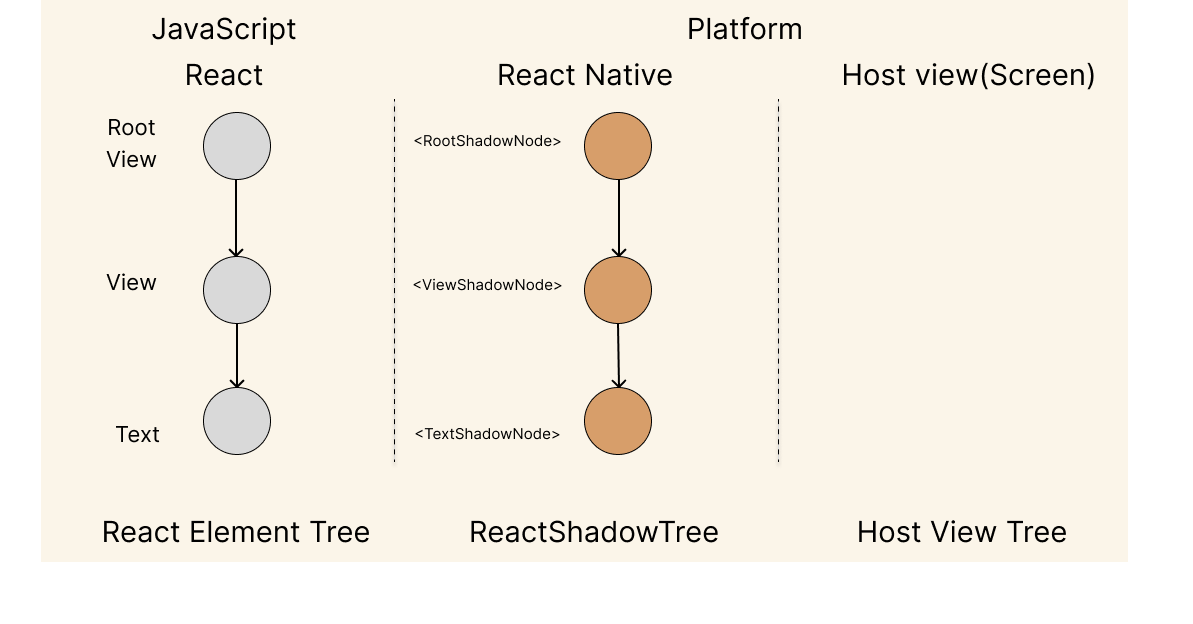
Render: As React Elements are processed, the renderer creates React Shadow Nodes in a synchronous manner. This occurs only for React Host Components (like
<View>and<Text>) but not for React Composite Components (like<MyComponent>). For example,<View>creates a ViewShadowNode, and<Text>creates a TextShadowNode. However, there's no React Shadow Node directly representing<MyComponent>.Note That, the creation of React Shadow Node, and the creation of a parent-child relationship between two React Shadow Nodes) are synchronous and thread-safe operations that are executed from React into the renderer (C++), usually on the JavaScript thread.
The result of the Render phase will look like this
Commit: This Phase mainly consists of two task
Layout Calculation and Tree Promotion
Layout Calculation: During this operation, React Native calculates the position and size of each React Shadow Node. It uses Yoga, a layout engine, to perform these calculations. To do this, it needs the styles of each React Shadow Node from the corresponding React Element in JavaScript. Additionally, it requires the layout constraints of the root of the React Shadow Tree to determine the available space for the resulting nodes. This ensures that the UI components are properly positioned and sized on the screen.
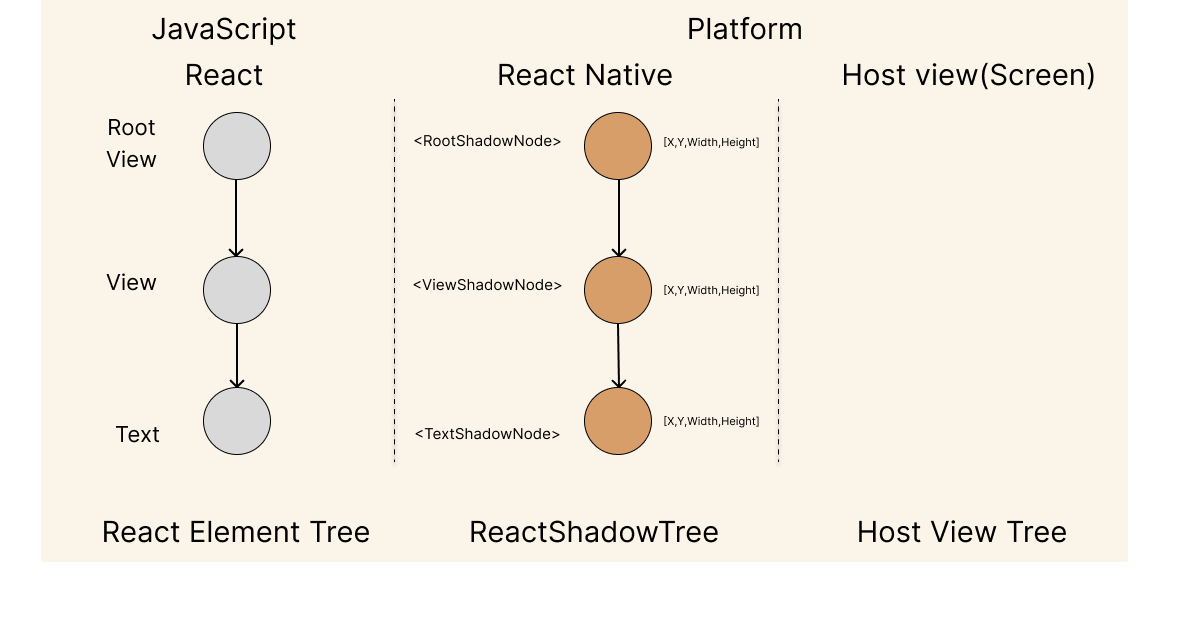
Tree Promotion: During this operation, the new React Shadow Tree becomes the "next tree" to be mounted, indicating that it contains all the necessary information and represents the latest state of the React Element Tree.
The actual mounting process happens on the next "tick" of the UI Thread, ensuring that the updated UI is displayed to the user in a smooth and efficient manner.Most of the layout calculations are performed within C++. Nevertheless, certain component layouts are contingent upon the underlying platform they are hosted on. For example, elements like Text and TextInput necessitate platform-specific calculations for determining their size and positioning
Mount: The mount phase transforms the Final React Shadow Tree into a Host View Tree, drawing the actual pixels on the screen.
In simple words, the renderer takes one React Shadow Node and creates the corresponding Host View, in our case, it will create the
android.view.Viewfor our<View>andandroid.widget.TextViewfor our<Text>in Android and, iOS it creates UIView is created and UITextView is populated with the text.Here, the Mount phase can be further divided into 3 phases
- Tree Diffing
2)Tree Promotion
- View Mounting
Now, Here Note that the Render Pipeline is across multiple threads, In the benefits section, you may have noticed that the new renderer is Thread Safe.
The Renderer uses 3 Threads
JS Thread- Where the Render phase is done
UI Thread - it controls the host views
Background Thread - responsible for Layout calculation
Here, I am not much deep diving into the threading model else we will be discussing only fabric 😅 , but if you are really interested to dive into it, check it out Here.
Additionally, you may want to check out how the View Flatting works.
This is just a basic overview of Fabric, you can refer to the official React native documentation for a detailed explanation of Fabric.
Now Let's discuss TurboModules.
TurboModules
We already discussed NativeModules and how they work in the current architecture, So TurboModules are the enhancements to the old Native Modules.
The new architecture allows JavaScript to hold references to Native Modules(of course Via JSI). This change enables JavaScript code to load each module only when it is needed, rather than initializing all modules at the start.
As a result, React Native apps will experience a significant improvement in start-up time, making the app launch faster and more responsive for users. This optimization ensures that the app loads only the necessary modules, reducing unnecessary overhead and improving overall performance.
Benefits provided by Turbo Native Modules :
Consistent, strongly typed interfaces across platforms.
Option to write code in C++ or integrate with other native languages, reducing duplication across platforms.
Lazy loading of modules for faster app startup.
Efficient communication between native and JavaScript code using JSI is better than the traditional bridge.
So, Let's see what is Codegen
Codegen
Before going into it, just see the below picture and think about what this means
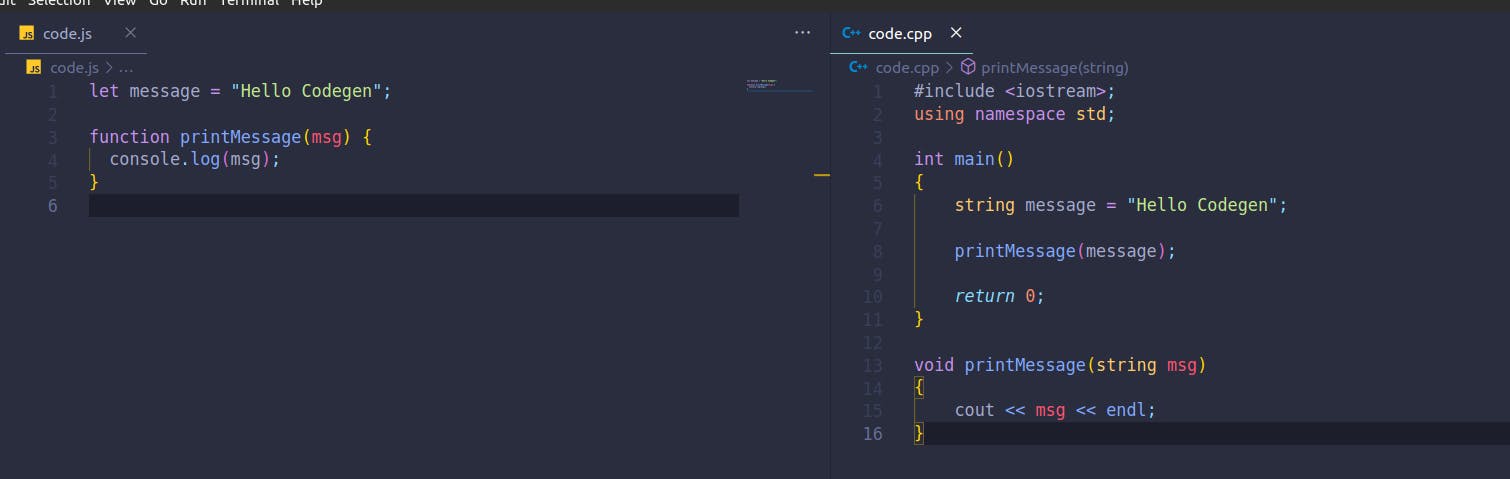
Here, I have written a simple program that prints the message to the console in JS and C++. As you see, we are not declaring any types in the JS Code, but in the C++ code, we have declared the return type of function, and type of variable as C++ is a statically typed language while JavaScript is a dynamically typed language.
And We are heavily working with JavaScript(But Mostly I use TypeScript) and C++ in React Native, so it's a high chance that we make a mistake in the typings.
Codegen is a helpful tool that we can use to avoid writing lots of repetitive code. It's not a strict rule, and you can choose not to use it. Instead of writing all the code(All the typings in C++ and mapping between C++ types, and the JS part) yourself.
Codegen generates some basic code for us, like a scaffold. This can save us a lot of time and effort, making our development process faster and more efficient.
If you have ever worked with GraphQL, you know that there is a graphql codegen, we write our queries, mutation, and fragments, define our config, we then give the schema and it generates the types and hooks(if plugins are provided).
In simple words,
By using typed JavaScript as the main reference, CodeGen creates interface elements for Turbo Modules and Fabric. It generates more native code during the build process, not when the app runs. This approach ensures better performance and consistency between JavaScript and native modules. It's like preparing everything in advance, so the app runs smoothly without additional work during runtime.
In React Native, Codegen is automatically triggered every time we build our iOS or Android app. It generates the necessary code to ensure smooth communication between JavaScript and native modules. However, sometimes we might want to run the Codegen scripts manually to see which types and files are actually generated. (Curiosity at its peak) This manual execution allows you to check the generated code and ensure everything is working as expected.
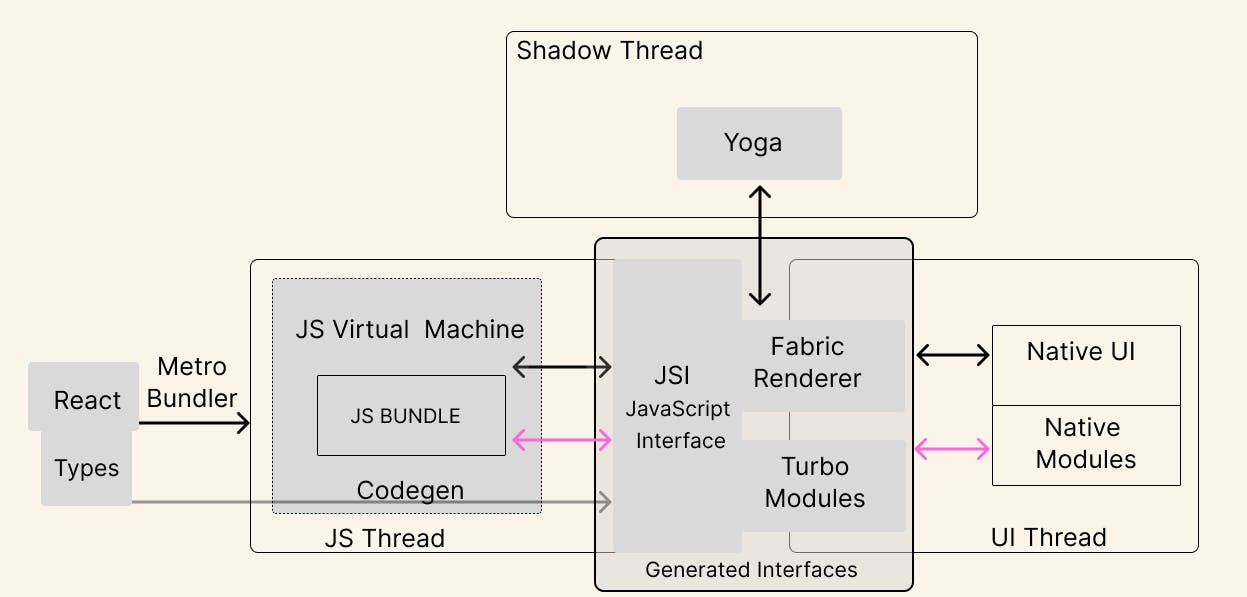
Here's the final visualization of the new architecture!
Here, I am dropping the reference to some libraries which supports the New architecture and you may want to see the code and how they implemented it.
React Native Reanimated: https://github.com/software-mansion/react-native-reanimated/
React Native Gesture Handler: https://github.com/software-mansion/react-native-gesture-handler
React Native Vision Camera: https://github.com/mrousavy/react-native-vision-camera/tree/v3
React Native mmkv: https://github.com/mrousavy/react-native-mmkv
This is just a basic list, you can find the exhaustive list of all react Native Libraries here: https://reactnative.directory/
Bonus
If you go through the above library codebases, and if you explore the Android part, you may notice this keyword native ,jni , What is that?
So I have written a dedicated blog on JNI and how it enables communication between Java and C++ with a detailed explanation and examples.
Here you go: https://blog.devvivek.tech/jni-calling-cpp-code-from-java
Note that I have discussed the basics of JNI and the new architecture goes beyond and you may want to check out FBJNI.
So, It's all about the New architecture of React Native, If you followed here, Give yourself an appreciation.
If you found this blog helpful and informative, consider sharing it with your friends, colleagues, and followers on social media.
Your support means a lot to me and motivates me to create more content like this!
By sharing this blog, you not only help others discover useful insights, but you also contribute to building a supportive community of learners and developers. Plus, you never know who might benefit from the information shared here! (Like I got every time and leaves a reaction to encourage them)
So, A Last question?
Do you want to create a basic app with new architecture, and want to experiment with what we discussed in the article, Let me know in the comments or you can DM me on Twitter or XMTP(If you are a web3 guy).
Sharing My Socials, in case you want to connect with me(Yup, I use them all)
Twitter: theviveksuthar
Lens: iamvivek
BlueSky: devvivek
Farcaster: devvivek
Github: Vivek Suthar
My Portfolio : devvivek.tech
Thank you for being part of this journey with me.
Until Next Time,
Keep Coding, Keep Debugging.
Note: I am also actively learning and building with React Native , and this article represents what I understand and I have taken many references from various sources , official react native docs, gone through many codebases and compiled this blog, getting all things at a one place in a organized manner, If you find any thing which is not here or is wrong, Feel free to DM or just write in the comments, I warmly welcome all suggestions ,
And This Blog represents the Latest information as of August 2023, As the New architecture is in active development, there may be some breaking changes , So if you are reading this in a future ,and find anything which is not here, just drop it in the comment section so I can update it .